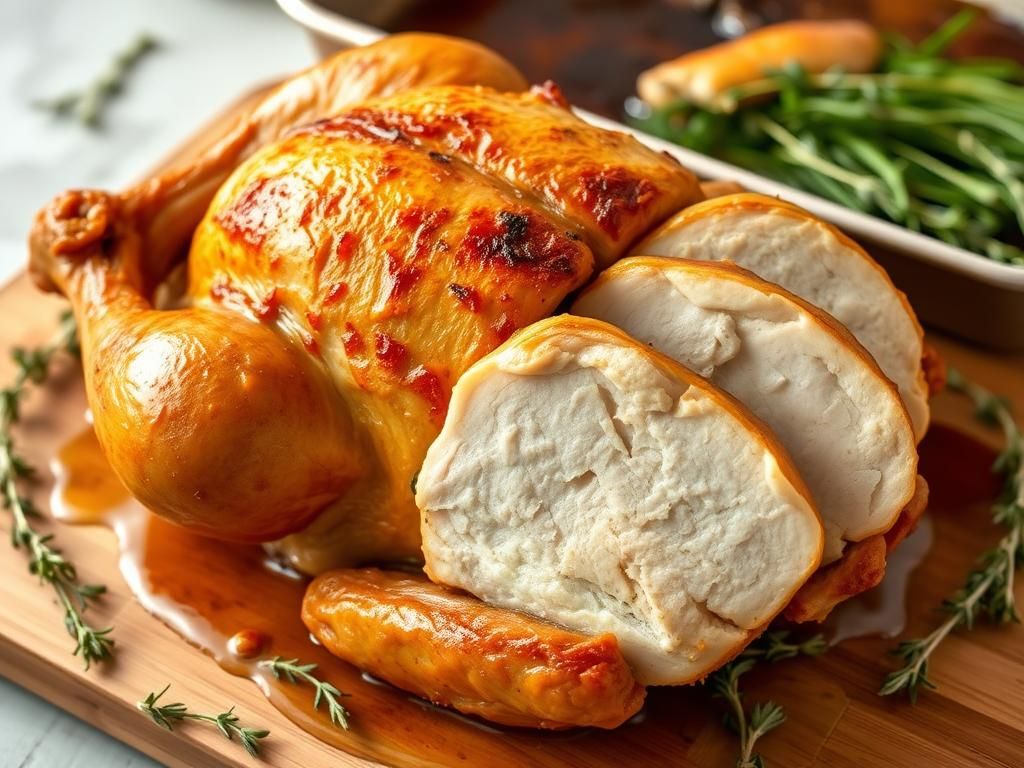
Tired of battling dry, uninspiring roast chicken that falls short of your Sunday dinner dreams? Ina Garten’s iconic Perfect Roast Chicken recipe transforms a simple whole chicken into a culinary masterpiece, celebrated for its foolproof simplicity and incredible flavor. Imagine: incredibly juicy meat, shatteringly crispy golden-brown skin, and a home filled with the fragrance of lemon, garlic, and thyme. This isn't just a recipe; it's a reliable technique for achieving a showstopping roast chicken every single time. In this comprehensive guide, we'll delve into the secrets behind Ina's Perfect Roast Chicken, walk you through each step, share invaluable tips, and help you troubleshoot common pitfalls, ensuring your next Sunday dinner centerpiece is nothing short of perfection.
Table of Contents
- Why Ina Garten's Roast Chicken Recipe is a Timeless Classic
- Mastering Ina's Perfect Roast Chicken: A Step-by-Step Guide
- Essential Tips for Achieving Ina's Perfect Roast Chicken Every Time
- Beyond the Basics: Elevating Your Roast Chicken Experience
- Common Roast Chicken Pitfalls and How to Avoid Them (Inspired by Ina's Wisdom)
- Frequently Asked Questions about Ina's Perfect Roast Chicken
Why Ina Garten's Roast Chicken Recipe is a Timeless Classic
Ina Garten, the Barefoot Contessa, has a gift for simplifying classic dishes without sacrificing elegance or flavor. Her approach to roast chicken is a testament to this philosophy, making it a beloved go-to for home cooks everywhere, especially for a comforting Sunday dinner.
The Beauty of Simplicity: Ina's Approach
What sets Ina's Perfect Roast Chicken method apart is its elegant simplicity. There are no complicated techniques or obscure ingredients. Instead, it focuses on high-quality basics: a good whole chicken, fresh aromatics like lemon, garlic, and thyme, generous seasoning with salt and pepper, and a straightforward roasting process. This simplicity is its strength, allowing the natural flavors of the chicken to shine.
Many recipes overcomplicate what should be a rustic, satisfying dish. Ina strips it back, proving that a few well-chosen elements, treated with care, can yield extraordinary results. This makes the recipe accessible to cooks of all skill levels, from beginners to seasoned pros looking for a reliable method.
Consistent, Delicious Results Every Time
One of the main reasons for the enduring popularity of this roast chicken technique is its reliability. Follow the core principles, and you're virtually guaranteed a chicken that is moist and tender on the inside with wonderfully crispy, golden-brown skin on the outside. This consistency removes the guesswork and anxiety that can often accompany roasting a whole chicken.
The method's robustness means that even slight variations in oven temperature or chicken size are generally forgiving. This reliability is key for anyone wanting to serve a perfect roast chicken for a special occasion like a Sunday dinner without any last-minute stress.
Perfect for Any Occasion, Especially Sunday Dinner
While Ina's Perfect Roast Chicken feels special enough for a holiday meal, it's also straightforward enough for a weeknight. However, it truly shines as the centerpiece of a Sunday dinner. There's something deeply comforting and traditional about gathering around a table to share a beautifully roasted chicken.
The aroma alone is enough to make any meal feel like an event. Its versatility also means it pairs well with a wide array of side dishes, from simple roasted vegetables to creamy mashed potatoes, making it adaptable to any season or preference.
Mastering Ina's Perfect Roast Chicken: A Step-by-Step Guide
Achieving that coveted juicy, crispy-skinned roast chicken à la Ina Garten is within your reach. It’s all about a few key steps, quality ingredients, and paying attention to detail. Let's break down the process to create your own Ina's Perfect Roast Chicken.
Gathering Your Ingredients: Quality Matters
The foundation of any great dish, especially one as simple as roast chicken, lies in the quality of its components.
-
The Whole Chicken: What to Look For
- Aim for a whole chicken around 4-5 pounds (approximately 1.8-2.3 kg). This size is ideal for even cooking and serves a small family well.
- Look for a chicken that is plump, with taut, blemish-free skin. If possible, opt for an organic, free-range, or air-chilled chicken. These often have better flavor and texture.
- Ensure the chicken is thoroughly thawed if previously frozen. Thaw it safely in the refrigerator over 1-2 days.
-
Aromatics & Seasonings: The Flavor Foundation
- Kosher Salt and Freshly Ground Black Pepper: Don't skimp here. Generous seasoning is crucial. Ina famously emphasizes using enough salt.
- Lemons: One or two lemons, quartered or halved, to stuff into the cavity. They add moisture and a bright, zesty flavor.
- Garlic: A whole head of garlic, halved crosswise, or several cloves, lightly smashed, tucked into the cavity.
- Fresh Herbs: Thyme is classic for Ina's chicken. A generous bunch is perfect. Rosemary or sage can also be used or added.
- Fat: Unsalted butter, softened, or good quality olive oil to rub on the skin for crispiness and color.
Preparing Your Whole Chicken for Roasting
Proper preparation is non-negotiable for achieving that perfect roast chicken.
-
Patting it Dry: The Secret to Crispy Skin
- Remove the chicken from its packaging and take out any giblets from the cavity (save them for stock!).
- Using paper towels, pat the chicken thoroughly dry, inside and out. This is a critical step for achieving super crispy skin. Excess moisture will steam the skin rather than allowing it to crisp.
-
Seasoning Generously: Inside and Out
- Season the cavity of the whole chicken liberally with kosher salt and freshly ground black pepper.
- Next, season the entire exterior of the chicken generously. Lift the skin over the breast and thighs and try to get some seasoning directly onto the meat if you can.
-
Stuffing the Cavity: Flavor Infusion
- Stuff the cavity with your prepared aromatics: lemon wedges, garlic halves, and fresh thyme sprigs.
- Don't overpack the cavity, as this can prevent even cooking. The goal is to perfume the meat from the inside out as it roasts.
-
Optional: Trussing
- Trussing (tying the legs together and securing the wings) can help the chicken cook more evenly and maintain a more attractive shape. Ina often does a simple truss. We'll discuss this more in the tips section.
The Roasting Process: Temperature and Timing for Your Roast Chicken
This is where the magic happens. Ina typically roasts her chicken at a consistent high temperature.
- Oven Temperature: Preheat your oven to 425°F (220°C). A hot oven is key for that initial sizzle and developing crispy skin quickly.
- Roasting Pan: Place the prepared chicken in a roasting pan, ideally on a V-rack or on a bed of roughly chopped root vegetables (like carrots, onions, and celery) which can also serve as a delicious side. This elevates the whole chicken, allowing hot air to circulate for more even cooking and crispier skin.
- Initial Roasting: Rub the skin with softened butter or olive oil. Place the chicken in the preheated oven.
- Roasting Time: A 4-5 pound chicken will typically take about 1 hour and 15 minutes to 1 hour and 30 minutes to roast at 425°F. Start checking for doneness around the 1-hour mark.
- Knowing When It's Done: Internal Temperature is Key
- The most reliable way to check for doneness is with a meat thermometer. Insert it into the thickest part of the thigh, avoiding the bone.
- The chicken is cooked when the internal temperature reaches 165°F (74°C) as recommended by the FDA for food safety.
- The juices should also run clear when the thigh is pierced with a knife. If they are pink, it needs more time.
Resting Your Roast Chicken: The Crucial Final Step
This might be the hardest part – waiting – but it's essential for a juicy roast chicken.
- Once the chicken reaches the correct internal temperature, remove it from the oven.
- Tent it loosely with aluminum foil and let it rest on a cutting board for at least 15-20 minutes before carving.
- This allows the juices, which have migrated to the center of the bird during cooking, to redistribute throughout the meat. Carving too soon will result in a flood of juices onto your cutting board and drier meat. Trust me, patience here pays off tenfold.
Essential Tips for Achieving Ina's Perfect Roast Chicken Every Time
Beyond the basic steps, a few extra pearls of wisdom can elevate your roast chicken from good to Ina's Perfect Roast Chicken level. These are the little things that seasoned cooks swear by.
Choosing the Right Roasting Pan for Your Whole Chicken
The pan you use can significantly impact your roast chicken. A heavy-duty roasting pan that conducts heat well is ideal.
- Size: Choose a pan that comfortably fits the whole chicken without too much extra space. Too large a pan can cause the drippings to spread out and burn. Too small, and the chicken might steam rather than roast.
- Material: Stainless steel or cast iron are excellent choices. Avoid flimsy disposable aluminum pans if possible, as they don't promote the best browning.
- Rack it Up: Using a roasting rack (V-rack or flat rack) inside the pan allows hot air to circulate all around the chicken, leading to crispier skin and more even cooking. If you don't have a rack, you can create a makeshift one by placing the chicken on a bed of roughly chopped sturdy vegetables like carrots, onions, and celery.
Don't Crowd the Pan: Giving Your Chicken Space
If you're roasting vegetables alongside your whole chicken in the same pan, ensure there's enough space. Overcrowding lowers the temperature around the chicken and vegetables, leading to steaming instead of roasting. This can result in soggy skin and unevenly cooked veggies.
It's often better to roast vegetables in a separate pan if you're making a large quantity. If roasting in the same pan, add them about halfway through the chicken's cooking time, depending on the vegetable.
The Importance of a Good Meat Thermometer
We've mentioned it before, but it bears repeating: a reliable instant-read meat thermometer is your best friend when roasting any meat, especially a whole chicken.
- Accuracy: It takes the guesswork out of determining doneness, preventing both undercooked (unsafe) and overcooked (dry) chicken.
- Placement: For a whole chicken, insert the thermometer into the thickest part of the thigh, making sure not to touch the bone, as the bone will give an inaccurate reading. Also check the thickest part of the breast. The magic number is 165°F (74°C) in the thigh.
Letting the Chicken Come to Room Temperature (Slightly)
While you don't want to leave a chicken out at room temperature for an unsafe period, taking it out of the refrigerator about 30-60 minutes before roasting can help it cook more evenly.
A chicken that's fridge-cold all the way through will take longer to cook, and the breast meat might dry out before the thighs are fully cooked. Allowing it to warm up slightly helps the heat penetrate more uniformly.
Trussing Your Chicken: To Truss or Not to Truss?
Trussing involves tying the chicken into a compact shape, usually by securing the legs together and tucking the wing tips. Ina often does a simple truss.
- Pros: It helps the whole chicken cook more evenly, as it prevents the legs and wings from splaying out and cooking too quickly or drying out. It also makes for a more attractive presentation.
- Cons: Some argue it can prevent the dark meat in the thigh area from cooking as quickly, or that the skin under the trussed areas doesn't crisp as well.
- The Verdict for Ina's Style: A simple truss – crossing the legs and tying them with kitchen twine, and tucking the wing tips under the body – is generally beneficial for this style of roast chicken. For a detailed guide on various trussing techniques, resources like Serious Eats often explore cooking methods in depth.
Beyond the Basics: Elevating Your Roast Chicken Experience
Once you've mastered Ina's Perfect Roast Chicken, there are many ways to enhance the meal and make the most of your culinary triumph. From a luscious pan gravy to creative uses for leftovers, your Sunday dinner can extend its deliciousness.
Crafting the Perfect Pan Gravy from Drippings
Those beautiful, flavorful drippings left in the roasting pan are liquid gold! Don't let them go to waste. Making a simple pan gravy is easier than you think.
- Remove Excess Fat: After removing the roast chicken to rest, carefully pour the pan drippings into a heatproof bowl or fat separator. Allow the fat to rise to the top, then spoon it off, reserving a tablespoon or two.
- Deglaze: Place the roasting pan over medium heat on the stovetop. Add a splash of chicken broth, white wine, or even water to the hot pan to deglaze, scraping up all the browned bits (fond) from the bottom with a wooden spoon. These bits are packed with flavor.
- Make a Roux (Optional): In the same pan, or a small saucepan, melt the reserved chicken fat (or butter). Whisk in an equal amount of all-purpose flour and cook for 1-2 minutes until golden. This is your roux, which will thicken the gravy.
- Simmer: Gradually whisk the deglazed pan juices and any remaining skimmed drippings into the roux. Add more chicken broth until you reach your desired consistency. Bring to a simmer and cook for 5-10 minutes, stirring occasionally, until the gravy has thickened.
- Season: Taste and adjust seasoning with salt, pepper, and perhaps a touch of fresh herbs like thyme or parsley. Strain for an extra smooth gravy if desired.
Delicious Side Dishes for Your Sunday Dinner Roast Chicken
A perfect roast chicken deserves equally delicious companions. Here are some classic and complementary side dishes for your Sunday dinner:
- Roasted Vegetables: Potatoes (russets, Yukon golds, or fingerlings), carrots, parsnips, Brussels sprouts, or butternut squash tossed with olive oil, salt, pepper, and herbs, roasted until tender and caramelized. These can often be roasted alongside or after the chicken.
- Creamy Mashed Potatoes: The ultimate comfort food to soak up that delicious chicken jus or gravy.
- Garlic Sautéed Green Beans or Asparagus: A fresh, vibrant green vegetable adds color and a lighter touch.
- Simple Green Salad: A crisp salad with a light vinaigrette can provide a refreshing contrast to the richness of the roast chicken.
- Crusty Bread: Essential for soaking up every last bit of juice and gravy.
Creative Uses for Leftover Roast Chicken
If you're lucky enough to have leftovers from your whole chicken, they can be transformed into equally delightful meals:
- Chicken Sandwiches: Classic, with mayonnaise, lettuce, and tomato on good bread.
- Chicken Salads: Chopped chicken mixed with celery, onion, herbs, and a creamy dressing.
- Chicken Soups or Noodle Dishes: Add shredded chicken to brothy soups or stir-fries.
- Chicken Tacos or Quesadillas: A quick and easy way to repurpose leftover meat.
- Chicken Stock: Don't throw away the carcass! Use it to make a rich, flavorful homemade chicken stock – the base for countless other recipes.
Wine Pairings to Complement Your Perfect Roast Chicken
The right wine can elevate your roast chicken dinner. Given the savory herbs and bright lemon often used in Ina's Perfect Roast Chicken, consider these pairings:
- White Wines:
- Chardonnay: An oaked Chardonnay can complement the richness, while an unoaked or lightly oaked one (like a Mâcon-Villages from Burgundy) matches the chicken's elegance.
- Sauvignon Blanc: Its herbaceous notes and acidity can cut through the richness and pair well with lemon and thyme.
- Red Wines:
- Pinot Noir: A light-to-medium-bodied Pinot Noir with its earthy notes and bright acidity is a classic pairing for roast chicken.
- Beaujolais: A fruity, light-bodied Gamay (like Beaujolais-Villages) is another excellent choice that won't overpower the chicken.
Ultimately, the best wine pairing is one you enjoy!
Common Roast Chicken Pitfalls and How to Avoid Them (Inspired by Ina's Wisdom)
Even seasoned cooks can encounter a hiccup now and then. Understanding common roast chicken problems and how to prevent them will ensure your path to Ina's Perfect Roast Chicken is smooth.
The Dry Chicken Dilemma: Conquering Overcooked Meat
This is perhaps the most feared outcome. Dry chicken, especially breast meat, is a disappointment.
- Cause: Overcooking is the primary culprit. Leaving the chicken in the oven for too long, or at too low a temperature for an extended period, will dry it out.
- Solution:
- Use a meat thermometer! Cook to 165°F (74°C) in the thickest part of the thigh and no higher. Remember that the temperature will continue to rise slightly as the chicken rests.
- Rest the chicken properly. This allows juices to redistribute.
- Don't be afraid of high heat. Ina's method often uses a higher, consistent temperature (like 425°F/220°C), which cooks the chicken relatively quickly, helping to keep it juicy.
The Soggy Skin Syndrome: Achieving Ultimate Crispiness
Pale, flabby skin is the antithesis of a perfect roast chicken.
- Cause: Too much moisture. This can come from not drying the chicken thoroughly, overcrowding the pan, or roasting at too low a temperature. Basting can sometimes contribute to less crispy skin if not done carefully.
- Solution:
- Pat the chicken skin thoroughly dry with paper towels before seasoning. You can even let it air-dry uncovered in the fridge for a few hours or overnight for extra crispy skin (a technique often used for Peking duck).
- Roast at a sufficiently high temperature (400-425°F / 200-220°C).
- Ensure good air circulation by using a roasting rack and not overcrowding the pan.
- Avoid excessive basting if aiming for super crispy skin. Ina's method typically doesn't require basting due to the initial fat rub and high heat.
Uneven Cooking: Ensuring Every Part is Perfect
Sometimes, the breast cooks faster than the dark meat, or one side of the chicken browns more than the other.
- Cause: Hot spots in your oven, or the different parts of the whole chicken naturally cooking at different rates (breast meat is leaner and cooks faster than thigh meat).
- Solution:
- Rotate the pan halfway through cooking if you know your oven has hot spots.
- Trussing can help promote more even cooking.
- Some cooks start the chicken breast-side down for the first 20-30 minutes, then flip it breast-side up to finish. This allows the thighs to get a head start and the breast to be basted by its own juices.
- If the breast skin is browning too quickly before the thighs are done, you can loosely tent the breast with a piece of foil.
The Flavor Faux Pas: Avoiding Under-seasoning
A beautifully cooked chicken that lacks flavor is a letdown.
- Cause: Simply not using enough salt and pepper, or not seasoning deeply enough.
- Solution:
- Season generously, inside and out. Use kosher salt, which has larger crystals and is easier to distribute evenly. Don't forget to season the cavity.
- Season under the skin of the breast if possible.
- Use fresh, good-quality aromatics (lemon, garlic, herbs) in the cavity.
- Remember that some seasoning will render off with the fat, so be bold. Ina Garten is known for encouraging generous seasoning, and it makes a huge difference in the final taste of your roast chicken.
Frequently Asked Questions about Ina's Perfect Roast Chicken
Here are some common questions that arise when aiming to create that delicious Ina's Perfect Roast Chicken for your Sunday dinner or any meal.
What size whole chicken is best for Ina's recipe?
Ina Garten often recommends a 4 to 5-pound (approximately 1.8 to 2.3 kg) whole chicken. This size roasts relatively evenly, typically within 1 hour and 15 minutes to 1 hour and 30 minutes, and comfortably serves 3-4 people, making it ideal for a family Sunday dinner.
Can I use different herbs in Ina's Perfect Roast Chicken?
Absolutely! While fresh thyme is classic for Ina's Perfect Roast Chicken, feel free to experiment. Rosemary is a robust and wonderful alternative, or try a mix of thyme, rosemary, and sage. Tarragon also pairs beautifully with chicken. Use what's fresh and what you love.
How do I get extra crispy skin on my roast chicken?
The key steps are: 1) Pat the whole chicken thoroughly dry with paper towels. 2) Season generously with salt (salt helps draw out moisture). 3) Roast at a high temperature (400-425°F / 200-220°C). 4) Ensure good air circulation around the chicken using a rack. For exceptionally crispy skin, you can leave the salted chicken uncovered in the refrigerator for several hours or overnight before roasting.
Do I need to baste the chicken when following Ina's method?
Generally, no. Ina's Perfect Roast Chicken method, which involves rubbing the skin with fat (butter or olive oil) and roasting at a fairly high, consistent temperature, usually results in crispy skin and moist meat without the need for basting. Basting can sometimes make the skin less crispy.
How long should I let the roast chicken rest before carving?
Resting is crucial for a juicy roast chicken. Allow the whole chicken to rest, tented loosely with foil, for at least 15-20 minutes after removing it from the oven. This allows the internal juices to redistribute, ensuring the meat is moist and flavorful when carved.
What's the best way to store leftover roast chicken?
Once cooled, carve or shred the leftover roast chicken from the bone. Store it in an airtight container in the refrigerator for up to 3-4 days. For longer storage, you can freeze cooked chicken for up to 2-3 months.