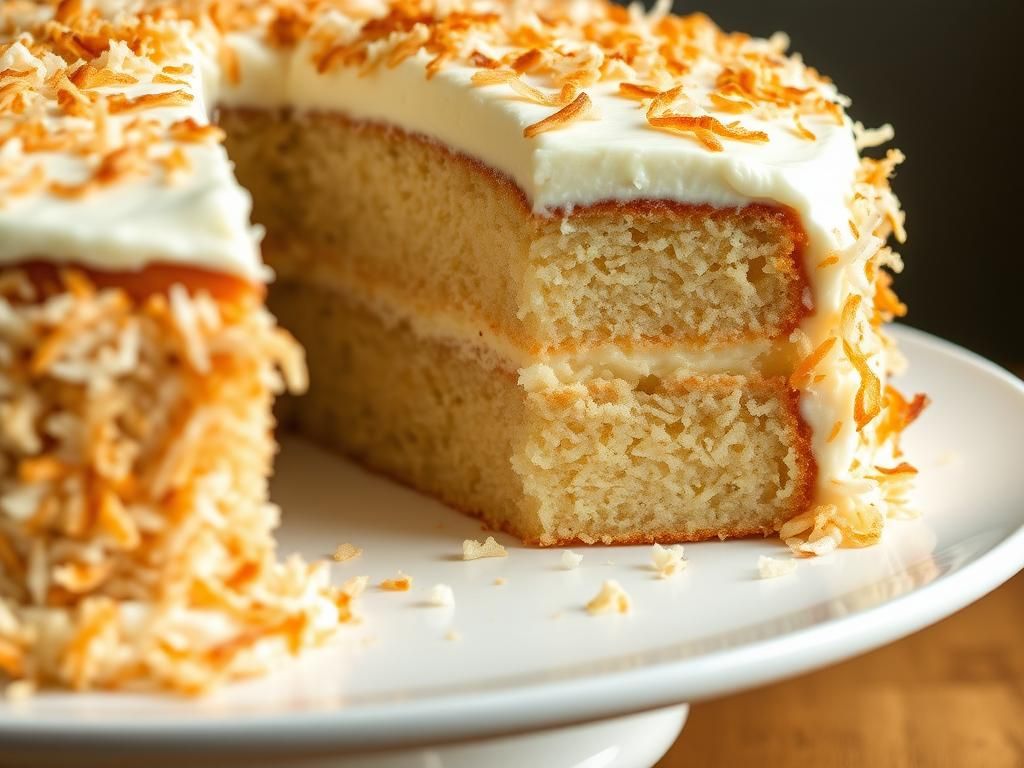
If you've been dreaming of a truly show-stopping Coconut Cake, one that's a perfect harmony of moist crumb, rich coconut flavor, and luscious frosting, then you've arrived at the right place. This isn't just any Layer Cake; it's a magnificent three-tiered Dessert masterpiece, generously adorned with sweet Shredded Coconut. We're talking three tender layers of coconut-infused cake, a dreamy cream cheese frosting, and a generous coating of that irresistible coconut goodness. Get ready to discover the secrets behind baking, frosting, and assembling the ultimate coconut confection that will have everyone asking for your recipe!
Table of Contents
- Why This Coconut Layer Cake is the Ultimate Dessert Experience
- Gathering Your Treasures: Ingredients for the Perfect Coconut Cake
- Essential Baking Tools for Your Layer Cake Adventure
- Step-by-Step to a Heavenly 3-Layer Coconut Cake
- Whipping Up the Ultimate Coconut Cream Cheese Frosting
- Assembling Your Stunning Coconut Layer Cake Masterpiece
- Secrets to Achieving the Moistest Coconut Cake Ever
- Playing with Flavors: Coconut Cake Variations and Customizations
- Storing Your Coconut Cake Creation for Lasting Freshness
- Frequently Asked Questions about The Ultimate 3-Layer Coconut Cake
Why This Coconut Layer Cake is the Ultimate Dessert Experience
There are coconut cakes, and then there's this Coconut Cake. What sets this recipe apart? It’s a symphony of textures and authentic coconut flavor, designed to be the crowning glory of any celebration or a luxurious treat just because. This isn't just a cake; it's an experience.
First, the cake itself is incredibly moist, thanks to a careful balance of ingredients like buttermilk and coconut milk, which tenderize the crumb. We're not relying on artificial flavors here; real coconut, in multiple forms, ensures every bite is packed with genuine tropical goodness. The three layers make for an impressive presentation, creating that classic Layer Cake appeal that’s perfect for special occasions.
Then there's the frosting. A rich, tangy cream cheese frosting is the perfect counterpoint to the sweet cake, and it’s infused with even more coconut. Finally, the entire Dessert is enrobed in a generous blanket of Shredded Coconut, adding a delightful chewiness and visual appeal. This recipe is more than just instructions; it’s a guide to creating a memorable Coconut Cake that truly lives up to the "ultimate" title.
Gathering Your Treasures: Ingredients for the Perfect Coconut Cake
Creating an exceptional Coconut Cake starts with high-quality ingredients. Each component plays a vital role in the final texture and flavor. Here’s what you’ll need to embark on this delicious journey:
For the Coconut Cake Layers:
- All-Purpose Flour: The structural backbone of our cake. Ensure it's accurately measured – spooned and leveled, not scooped.
- Granulated Sugar: Provides sweetness and contributes to a tender crumb.
- Baking Powder & Baking Soda: Our leavening agents, crucial for a light and airy Layer Cake. Make sure they're fresh for optimal rise.
- Salt: Balances the sweetness and enhances all the other flavors.
- Unsalted Butter: At room temperature, this is key for a properly creamed batter, leading to a tender cake. Using unsalted allows you to control the salt content.
- Eggs: Large eggs, also at room temperature, bind the ingredients and add richness.
- Coconut Extract: A concentrated burst of coconut flavor. Use a good quality extract.
- Vanilla Extract: Complements the coconut and adds depth.
- Full-Fat Coconut Milk: Not coconut water or cream of coconut. This adds moisture and a subtle coconut flavor to the cake itself. Shake the can well before using.
- Buttermilk: Its acidity reacts with the baking soda for a tender crumb and adds a slight tang. Room temperature is best.
- Sweetened Shredded Coconut: Finely chopped, this will be folded into the batter for pockets of coconut goodness.
For the Dreamy Coconut Cream Cheese Frosting:
- Cream Cheese: Full-fat, brick-style, softened to room temperature. This is the base for our tangy, rich frosting.
- Unsalted Butter: Also softened to room temperature, it adds smoothness and stability to the frosting.
- Powdered Sugar: Sifted to prevent lumps, this sweetens and thickens the frosting.
- Coconut Extract: Reinforces the coconut theme.
- Vanilla Extract: A classic frosting flavor enhancer.
- Heavy Cream or Coconut Milk: A small amount to achieve the perfect spreading consistency.
- Sweetened Shredded Coconut: For coating the outside of the cake, and optionally, for stirring into the frosting. You can toast some of this for extra flavor and visual appeal. For details on different types of coconut products, you might find resources like the FoodData Central from the USDA helpful for nutritional information and product specifics.
Having all your ingredients prepped and at the correct temperatures (especially butter, eggs, cream cheese, and buttermilk) is a cornerstone of successful baking. It's a small step that makes a big difference in your Coconut Cake Dessert.
Essential Baking Tools for Your Layer Cake Adventure
While you don't need a professional pastry kitchen, a few key tools will make baking your Coconut Cake smoother and yield better results:
- Three 8-inch or 9-inch Round Cake Pans: Using three pans creates those beautiful, distinct layers. If you only have two, you can bake in batches, but three is ideal.
- Parchment Paper: For lining the cake pans. This guarantees your cake layers will release easily without sticking – a crucial step for a perfect Layer Cake.
- Electric Mixer (Stand or Handheld): Essential for properly creaming the butter and sugar, and for whipping up a fluffy frosting.
- Mixing Bowls: You'll need a few in various sizes for dry ingredients, wet ingredients, and the frosting.
- Measuring Cups and Spoons: Accurate measurements are critical in baking.
- Whisk: For combining dry ingredients evenly.
- Rubber Spatula: For scraping down the bowl and folding ingredients.
- Wire Cooling Racks: Absolutely necessary for cooling the cake layers completely before frosting.
- Offset Spatula: Your best friend for applying frosting smoothly and evenly. A bench scraper can also be very helpful for achieving smooth sides.
- Cake Turntable (Optional but Recommended): Makes frosting a multi-layer cake significantly easier and more professional-looking.
Investing in good quality basics will serve you well for this Coconut Cake and many other baking projects to come.
Step-by-Step to a Heavenly 3-Layer Coconut Cake
Now for the exciting part – bringing your Coconut Cake to life! We'll break this down into manageable steps. Remember, baking is a science, so precision and patience are your allies.
Preparing the Coconut Cake Batter
- Preheat and Prep: Preheat your oven to 350°F (175°C). Grease your three cake pans thoroughly with butter or baking spray. Line the bottoms with parchment paper rounds, then grease the parchment paper as well. Lightly flour the pans, tapping out any excess. This triple-prep ensures a clean release.
- Combine Dry Ingredients: In a medium bowl, whisk together the all-purpose flour, baking powder, baking soda, and salt. Set aside.
- Cream Butter and Sugar: In a large bowl, using an electric mixer, beat the room temperature unsalted butter on medium speed until creamy, about 1-2 minutes. Gradually add the granulated sugar and continue to beat for another 3-5 minutes, until light and fluffy. This step incorporates air, which contributes to a lighter cake.
- Add Eggs and Extracts: Beat in the room temperature eggs one at a time, mixing well after each addition. Scrape down the sides of the bowl as needed. Stir in the coconut extract and vanilla extract.
- Alternate Wet and Dry Ingredients: In a separate bowl or liquid measuring cup, whisk together the full-fat coconut milk and buttermilk. With the mixer on low speed, add the dry ingredients to the wet ingredients in three additions, alternating with the coconut milk mixture in two additions, beginning and ending with the dry ingredients. Mix only until just combined – overmixing develops gluten and can make the cake tough.
- Fold in Shredded Coconut: Gently fold in the finely chopped sweetened Shredded Coconut using a rubber spatula.
Your batter for the ultimate Coconut Layer Cake is now ready!
Baking Your Coconut Cake Layers to Perfection
- Divide Batter: Evenly divide the prepared batter among the three prepared cake pans. An easy way to do this is by using a kitchen scale to weigh each pan with batter, or by using an ice cream scoop for consistent portions.
- Bake: Bake in the preheated oven for 25-30 minutes for 8-inch pans, or 28-33 minutes for 9-inch pans. The cakes are done when a wooden skewer or toothpick inserted into the center comes out clean or with a few moist crumbs attached. The tops should be golden brown and spring back when lightly touched.
- Cool in Pans: Once baked, remove the cake pans from the oven and let them cool on wire racks for 10-15 minutes. This allows the cakes to set slightly before you try to remove them.
- Invert and Cool Completely: Carefully run a thin knife around the edges of each cake pan. Invert the cakes onto the wire racks, peel off the parchment paper, and let them cool completely. This can take 1-2 hours. Do not attempt to frost warm cakes, as the frosting will melt and slide right off. This patience is key for a successful Layer Cake Dessert.
Whipping Up the Ultimate Coconut Cream Cheese Frosting
While your cake layers are cooling, it's time to prepare the luscious coconut cream cheese frosting. This frosting is the perfect creamy, tangy complement to the sweet Coconut Cake.
- Beat Cream Cheese and Butter: In a large bowl, using an electric mixer with the paddle attachment (if using a stand mixer), beat the softened cream cheese and softened unsalted butter together on medium speed until smooth and creamy, about 2-3 minutes. There should be no lumps.
- Add Sugar Gradually: With the mixer on low speed, gradually add the sifted powdered sugar, one cup at a time, mixing until smooth after each addition. Scrape down the sides and bottom of the bowl frequently.
- Incorporate Flavors: Beat in the coconut extract and vanilla extract.
- Adjust Consistency: Add the heavy cream or coconut milk, one tablespoon at a time, beating until the frosting reaches a smooth, spreadable consistency. You want it thick enough to hold its shape but soft enough to spread easily.
- Optional – Fold in Coconut: If desired, you can gently fold in about 1/2 cup of Shredded Coconut into the frosting itself for extra texture and flavor.
Taste your frosting. Isn't it divine? This rich and flavorful topping is what takes your Coconut Dessert to the next level. If not using immediately, cover and refrigerate, but bring to a cool room temperature and re-whip briefly before frosting the cake.
Assembling Your Stunning Coconut Layer Cake Masterpiece
This is where your Coconut Cake truly becomes a showstopper! Assembling a layer cake might seem daunting, but with a few tips, you’ll create a beautiful dessert.
- Level Your Cakes (Optional but Recommended): If your cake layers have domed tops, use a long serrated knife to carefully slice off the domes, making them flat. This ensures your Layer Cake will be stable and even. (The scraps are a delicious baker's treat!)
- First Layer: Place one cake layer, top-side down (the flat bottom makes a sturdier base), onto your cake stand or serving plate. If using a turntable, you can place a small dollop of frosting on the plate first to "glue" the cake layer down and prevent slipping.
- Frost the First Layer: Scoop about 1 to 1.5 cups of frosting onto the center of the first cake layer. Using an offset spatula, spread the frosting evenly out to the edges.
- Add Second Layer: Carefully place the second cake layer on top of the frosted first layer. Press down gently to adhere. Frost this layer just like the first.
- Add Third Layer: Place the third cake layer on top, again preferably top-side down for a flat surface.
- Crumb Coat (Highly Recommended): Apply a thin, even layer of frosting over the entire cake (top and sides). This is called a "crumb coat" and it traps any loose crumbs, preventing them from showing up in your final layer of frosting. Don't worry if it looks messy; that's its job!
- Chill: Refrigerate the crumb-coated cake for at least 30 minutes (or up to an hour) to allow the frosting to set. This step is a game-changer for a clean, professional finish on your Coconut Layer Cake.
- Final Frosting: Once chilled, apply the remaining frosting generously over the top and sides of the cake, using your offset spatula to create a smooth or beautifully textured finish. A bench scraper can help achieve very smooth sides if desired.
- Adorn with Shredded Coconut: Gently press the Shredded Coconut all over the sides and top of the frosted cake. You can do this by hand or by holding the cake over a large bowl or baking sheet to catch excess coconut. For an extra touch, consider toasting some of the coconut for a golden hue and nuttier flavor before applying.
Stand back and admire your beautiful, homemade Coconut Cake Dessert!
Secrets to Achieving the Moistest Coconut Cake Ever
Nobody likes a dry cake. Here are some key tips and techniques embedded in this recipe and philosophy to ensure your Coconut Cake is wonderfully moist every single time:
- Don't Overbake: This is the number one culprit for dry cakes. Start checking for doneness a few minutes before the recipe states. Use the toothpick test diligently.
- Room Temperature Ingredients: As mentioned before, ingredients like butter, eggs, and dairy (buttermilk, coconut milk) incorporate much better when at room temperature, leading to a smoother batter and a more tender crumb.
- Proper Fat Content: Full-fat coconut milk and butter contribute significantly to moisture. Don't skimp on these.
- Buttermilk Magic: The acidity in buttermilk not only activates baking soda for lift but also tenderizes the gluten in the flour, resulting in a softer, moister cake.
- Avoid Overmixing: Once you combine wet and dry ingredients, mix only until they are just combined. Overmixing develops too much gluten, which can lead to a tough, dry Layer Cake.
- Coconut Milk in Batter: Using coconut milk directly in the cake batter, not just in the frosting or as a soak, infuses moisture and subtle coconut flavor deep within the crumb.
- Cooling Properly: Allowing the cake layers to cool gradually as instructed prevents them from drying out too quickly.
- Simple Syrup Soak (Optional): For an extra guarantee of moisture, especially if you happen to slightly overbake, you can brush the cooled cake layers with a light simple syrup (equal parts sugar and water, heated until sugar dissolves, then cooled) before frosting. A coconut-flavored simple syrup (made with coconut water or a splash of coconut extract) would be even better for this Coconut Dessert.
By paying attention to these details, you're well on your way to baking a consistently moist and delicious Coconut Cake.
Playing with Flavors: Coconut Cake Variations and Customizations
While this classic Coconut Cake with cream cheese frosting is a dream, don't be afraid to experiment and make it your own! Here are a few ideas:
- Toasted Coconut: As mentioned, toasting your Shredded Coconut before adding it to the batter or using it for decoration adds a wonderful nutty depth and beautiful golden color. Spread coconut on a baking sheet and toast at 325°F (160°C) for 5-10 minutes, watching carefully as it burns easily.
- Pineapple Coconut Cake: Add 1/2 cup of well-drained, crushed pineapple to the cake batter for a tropical twist reminiscent of a piña colada. You could also add a thin layer of pineapple preserves between the cake layers.
- Lime or Lemon Zest: Incorporate the zest of 1-2 limes or lemons into the cake batter and/or frosting for a bright, citrusy counterpoint to the sweet coconut.
- Chocolate Coconut Cake: For a decadent variation, add 1/4 cup of unsweetened cocoa powder to the dry ingredients of the cake, or swirl melted chocolate into the frosting. Chocolate chips folded into the batter are also delicious.
- Different Frostings: While cream cheese frosting is classic, a Swiss meringue buttercream or an ermine frosting would also be lovely with this Coconut Layer Cake. You could even do a seven-minute frosting for a very traditional, fluffy finish.
- Nutty Additions: Fold in 1/2 cup of chopped, toasted pecans or almonds into the cake batter for added crunch and flavor.
- Coconut Rum Soak: For an adult version, brush the cooled cake layers with a light coconut rum simple syrup.
Feel free to get creative! The base of this Coconut Cake Recipe is solid, making it a perfect canvas for your culinary imagination.
Storing Your Coconut Cake Creation for Lasting Freshness
You've baked and assembled your magnificent Coconut Cake! Here’s how to store it to keep it tasting its best:
- Room Temperature: If your cake is made with cream cheese frosting (as this recipe is), it's generally recommended to refrigerate it due to the dairy content. However, for serving, cake is always best at room temperature. Allow refrigerated cake to sit out for at least 30-60 minutes before serving to let the frosting soften and flavors meld. Some sources suggest that cakes with cream cheese frosting can be left at room temperature for a few hours, but for longer storage, refrigeration is safer. Always refer to food safety guidelines, such as those provided by the FDA on safe food handling.
- Refrigeration: Cover the cake loosely with plastic wrap or store it in an airtight cake carrier in the refrigerator. The Shredded Coconut coating actually helps to prevent the cake from drying out too much in the fridge. It should keep well for 3-4 days.
- Freezing (Cake Layers): Unfrosted cake layers freeze beautifully. Once completely cooled, wrap each layer tightly in plastic wrap, then in aluminum foil or place them in a freezer-safe bag. They can be frozen for up to 2-3 months. Thaw overnight in the refrigerator before frosting.
- Freezing (Frosted Cake): You can also freeze a fully frosted cake, though the texture of the Shredded Coconut might change slightly upon thawing. Flash freeze the cake uncovered on a baking sheet until the frosting is firm (about 1-2 hours). Then, wrap it tightly in plastic wrap followed by aluminum foil. Thaw overnight in the refrigerator. Remove wrapping while still cold to prevent condensation from making the frosting soggy.
Proper storage ensures every slice of your Coconut Layer Cake Dessert is as delightful as the first.
Frequently Asked Questions about The Ultimate 3-Layer Coconut Cake
What kind of coconut milk is best for this Coconut Cake?
For this Coconut Cake recipe, full-fat canned coconut milk is highly recommended. It provides richness and moisture that light coconut milk or coconut milk from a carton (often diluted) won't achieve. Shake the can well before opening as the cream and water can separate. Avoid using cream of coconut, as it's heavily sweetened and will alter the cake's sweetness and texture.
Can I make this Coconut Layer Cake with unsweetened shredded coconut?
Yes, you absolutely can use unsweetened Shredded Coconut if you prefer a less sweet cake or want more control over the sugar content. If using unsweetened coconut, especially for the exterior, you might find the overall Dessert slightly less sweet, which many people enjoy. The sweetened coconut in the batter adds moisture as well as sweetness, so if you switch, the texture might be subtly different but still delicious.
My cake layers came out domed. Do I really need to level them?
While not strictly mandatory, leveling domed cake layers is highly recommended for a stable and professional-looking Layer Cake. Flat layers stack much more evenly, prevent the cake from wobbling, and ensure frosting is distributed uniformly. If you skip leveling, your finished Coconut Cake might lean or have uneven frosting layers.
Why is my cream cheese frosting runny?
Runny cream cheese frosting is usually due to one of two things: the cream cheese or butter was too warm (almost melted) when you started, or you overbeat it after adding all the ingredients, especially if your kitchen is warm. Ensure your cream cheese and butter are softened to a cool room temperature (around 65-70°F/18-21°C) – firm but yielding to gentle pressure. If it gets too soft, try chilling the frosting for 15-30 minutes and then gently re-mixing.
Can I make this Coconut Cake recipe into cupcakes?
Yes, this Coconut Cake batter adapts beautifully to cupcakes! Line a muffin tin with paper liners and fill them about two-thirds full. Baking time will be shorter, likely around 18-22 minutes at 350°F (175°C). Start checking for doneness with a toothpick around the 18-minute mark. You can then frost them with the coconut cream cheese frosting and sprinkle with Shredded Coconut. This makes for a delightful individual Dessert.
How far in advance can I make this 3-Layer Coconut Cake?
You can bake the cake layers 1-2 days in advance. Cool them completely, wrap them well in plastic wrap, and store them at room temperature (if using within a day) or in the refrigerator. The frosting can also be made 1-2 days ahead and stored in an airtight container in the refrigerator; let it come to cool room temperature and re-whip briefly before using. The fully assembled and frosted Coconut Layer Cake is often best the day after it's made, as this allows the flavors to meld, but it will keep well for 3-4 days refrigerated.