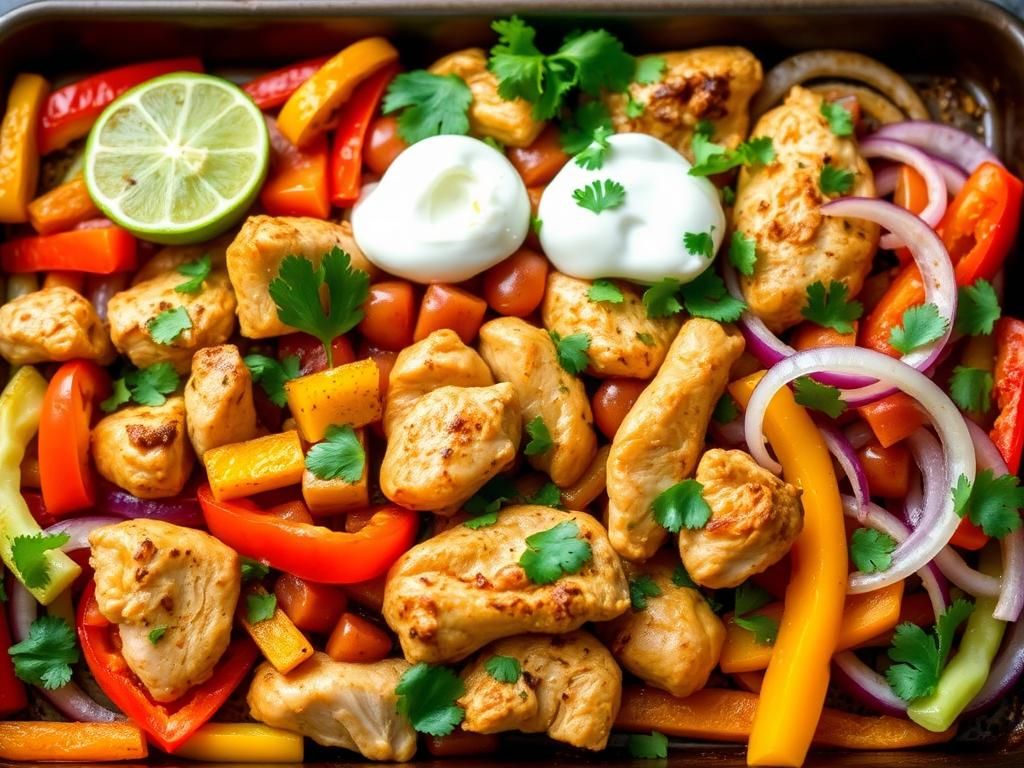
Tired of weeknight dinner dilemmas that end in a mountain of dishes? Imagine savoring sizzling, flavorful Sheet Pan Chicken Fajitas – a complete Tex-Mex meal cooked on a single pan, making Easy Cleanup a reality. This recipe features tender chicken, vibrant bell peppers, and sweet onions, all roasted to perfection with classic fajita spices, ready to be piled into warm tortillas. Get ready to transform your Weeknight Dinner routine with a dish that's as simple to make as it is to enjoy, delivering maximum flavor with minimal fuss. We'll walk you through every step, share tips for the best results, and show you why this will become your new go-to.
Table of Contents
- Why This Sheet Pan Chicken Fajitas Recipe is a Weeknight Winner
- Understanding the Magic: What Are Sheet Pan Chicken Fajitas?
- Gathering Your Flavor Arsenal: Key Ingredients
- The Simple Steps to Sensational Sheet Pan Chicken Fajitas
- Mastering the Easy Cleanup for Your Weeknight Dinner
- Customize Your Tex-Mex Feast: Variations and Additions
- Serving Your Sheet Pan Chicken Fajitas Like a Pro
- Beyond the Pan: Completing Your Tex-Mex Weeknight Dinner
- Storing and Reheating Your Delicious Leftovers
- Frequently Asked Questions about Easy Cleanup Sheet Pan Chicken Fajitas
Why This Sheet Pan Chicken Fajitas Recipe is a Weeknight Winner
Let's be honest, the idea of a delicious, home-cooked meal on a busy weekday can sometimes feel like a distant dream. That's precisely where the beauty of these Sheet Pan Chicken Fajitas shines. This isn't just another recipe; it's a solution to the weeknight scramble, a ticket to a flavorful Tex-Mex escape without the usual kitchen chaos.
The primary allure? Easy Cleanup. By cooking everything—chicken, peppers, and onions—on a single sheet pan, you dramatically reduce the number of pots and pans used. In my house, fajita night used to mean multiple skillets and a sink overflowing with dishes. Discovering this easy cleanup sheet pan chicken fajitas method was a revelation, especially for those demanding weeknight dinner slots.
But it's not just about convenience. Here’s why this recipe will quickly become a staple:
- Time-Saving: With minimal prep and a straightforward cooking process, you can have a satisfying meal on the table in under an hour. Most of that time is hands-off while the oven does the work.
- Incredibly Flavorful: Roasting the chicken and vegetables together allows their flavors to meld beautifully. The high heat of the oven encourages caramelization, bringing out a natural sweetness and a slight char that's characteristic of great fajitas.
- Family-Friendly & Customizable: Everyone loves fajitas! The build-your-own nature means even picky eaters can choose their favorite toppings. Plus, you can easily adjust the spice level or swap ingredients to suit different preferences.
- Relatively Healthy: Packed with lean protein and colorful vegetables, this dish offers a balanced and nutritious meal option. You control the ingredients, so you know exactly what you're eating.
Ultimately, this Sheet Pan Chicken Fajitas recipe empowers you to enjoy a vibrant, restaurant-quality Tex-Mex meal at home, even on the busiest of evenings, all while ensuring easy cleanup. It’s the perfect weeknight dinner solution that doesn't compromise on taste or satisfaction.
Understanding the Magic: What Are Sheet Pan Chicken Fajitas?
At its heart, Sheet Pan Chicken Fajitas are a modern, streamlined take on the classic Tex-Mex dish. Traditionally, fajitas involve grilling or pan-searing strips of meat (often skirt steak or chicken) and vegetables, then serving them sizzling hot with warm tortillas and an array of toppings. The "sheet pan" modification takes all those delicious components and roasts them together on a single baking sheet in the oven.
This method isn't just about convenience; it offers distinct culinary advantages:
- Even Cooking: A large sheet pan allows ingredients to spread out in a single layer, promoting even cooking and browning. This helps avoid the steaming effect that can happen in an overcrowded skillet.
- Flavor Development: The dry heat of the oven is excellent for caramelizing vegetables like bell peppers and onions, enhancing their natural sweetness. The chicken also benefits, developing a lovely roasted flavor.
- Hands-Off Approach: Once prepped and in the oven, there's minimal stirring or tending required, freeing you up to prepare toppings or simply relax. This is a huge plus for a weeknight dinner.
While the cooking method differs, the soul of the dish remains true to its Tex-Mex roots. You still get tender, seasoned chicken, sweet and slightly charred peppers and onions, and the interactive fun of assembling your own fajitas. It's the same beloved flavor profile, just made significantly easier for home cooks, especially when prioritizing easy cleanup. This adaptation makes a typically restaurant-centric meal perfectly achievable for a regular weeknight dinner.
Gathering Your Flavor Arsenal: Key Ingredients
The success of any great dish, including these easy cleanup sheet pan chicken fajitas, lies in using quality ingredients. Fortunately, the list for this Tex-Mex weeknight dinner is relatively simple and accessible.
Chicken: The Star Protein
- Best Choices: Boneless, skinless chicken breasts or thighs are ideal. Thighs tend to be more forgiving and stay juicier during roasting, but breasts work wonderfully too if you're careful not to overcook them.
- Preparation: Slice the chicken into uniform strips, about 1/4 to 1/2 inch thick. This ensures they cook evenly alongside the vegetables.
Bell Peppers: For Color and Sweetness
- Variety is Key: Use a mix of colors! Red, yellow, and orange bell peppers are sweeter and add visual appeal. Green bell peppers offer a slightly more savory, grassy note. A combination makes your sheet pan chicken fajitas vibrant.
- Nutrition Note: Bell peppers are packed with vitamins, especially Vitamin C. You can learn more about their nutritional benefits from resources like Healthline's article on bell peppers.
- Preparation: Slice them into strips similar in size to the chicken.
Onions: The Aromatic Foundation
- Type: Yellow or red onions work best. Yellow onions offer a balanced sweetness when roasted, while red onions provide a pop of color and a slightly sharper flavor that mellows with cooking.
- Preparation: Slice them into wedges or thick strips.
Fajita Seasoning: The Flavor Punch
- DIY vs. Store-Bought:
- Store-Bought: A convenient option for a quick weeknight dinner. Look for a brand with a good balance of spices and not too much sodium.
- DIY: Making your own is easy and allows you to control the ingredients. A typical blend includes chili powder, cumin, paprika (smoked paprika is excellent!), garlic powder, onion powder, oregano, salt, and a pinch of cayenne for heat if desired.
- Generosity is Good: Don't skimp on the seasoning! It’s crucial for that authentic Tex-Mex flavor.
Oil: For Roasting and Flavor
- Choose Wisely: A neutral oil with a relatively high smoke point is best, such as avocado oil, canola oil, or light olive oil.
- Purpose: Oil helps the ingredients roast rather than steam, promotes browning, and helps the seasoning adhere.
Tortillas: The Essential Wrap
- Flour or Corn: This is a matter of personal preference.
- Flour Tortillas: Soft, pliable, and a common choice for fajitas.
- Corn Tortillas: Offer a more traditional Tex-Mex flavor and are often gluten-free. Warm them properly to make them pliable.
- Size: Small to medium "fajita-size" tortillas (around 6-8 inches) are perfect.
With these key components, you're well on your way to creating delicious and visually appealing sheet pan chicken fajitas that boast an easy cleanup.
The Simple Steps to Sensational Sheet Pan Chicken Fajitas
One of the best things about this Sheet Pan Chicken Fajitas recipe is its straightforward process. It’s designed for minimal fuss, making it an ideal weeknight dinner when you're short on time but still crave something delicious and satisfying. Here's how to bring this Tex-Mex favorite to life with easy cleanup in mind.
H3: Step 1: Prep the Veggies and Chicken
- Preheat Your Oven: Get your oven preheating to a hot temperature, typically 400-425°F (200-220°C). High heat is key for getting that nice char on the vegetables and ensuring the chicken cooks through without drying out.
- Slice and Dice:
- Chicken: If you haven't already, slice your boneless, skinless chicken breasts or thighs into strips about 1/4 to 1/2 inch thick and 2-3 inches long. Try to keep them relatively uniform in size for even cooking.
- Bell Peppers: Core, seed, and slice your bell peppers (a mix of colors is great!) into similar-sized strips.
- Onion: Peel and slice your onion into strips or wedges.
- Combine: In a large mixing bowl, combine the sliced chicken, bell peppers, and onions. Using a bowl first ensures everything gets evenly coated with oil and seasoning.
H3: Step 2: Season Everything Generously
- Oil Up: Drizzle the chicken and vegetable mixture with your chosen oil (avocado, olive, or canola oil work well). Toss everything thoroughly to ensure each piece is lightly coated. This helps with browning and prevents sticking.
- Spice it Right: Sprinkle generously with your fajita seasoning. Whether you're using a store-bought blend or your own DIY mix, don't be shy! Toss again until all the ingredients are well-coated with the spices. This is where that signature Tex-Mex flavor comes from.
H3: Step 3: Arrange on the Sheet Pan (Key for Easy Cleanup!)
- Line Your Pan: This is a crucial step for easy cleanup. Line a large, rimmed baking sheet with parchment paper or aluminum foil. If using foil, lightly greasing it can also help prevent sticking, though parchment paper is often superior for non-stick properties.
- Spread in a Single Layer: Transfer the seasoned chicken and vegetables to the prepared baking sheet. Spread them out in a single, even layer. Do not overcrowd the pan! If necessary, use two sheet pans. Overcrowding will cause the ingredients to steam rather than roast, and you won't get that desirable char.
- Pro Tip: For crispier results, ensure there's a little space between the pieces.
H3: Step 4: Roasting to Perfection
- Into the Oven: Place the sheet pan in the preheated oven.
- Roast Time: Roast for 15-25 minutes, or until the chicken is cooked through and the vegetables are tender-crisp and slightly charred. The exact time will depend on the thickness of your chicken and vegetables and your oven's specific temperature.
- Check Chicken Doneness: Chicken should reach an internal temperature of 165°F (74°C). Use a meat thermometer to be sure. The FDA provides clear guidelines on safe minimum cooking temperatures for poultry.
- (Optional) Broil for Extra Char: If you want a bit more char, you can switch the oven to broil for the last 1-2 minutes. Keep a very close eye on it, as food can go from charred to burnt quickly under the broiler.
H3: Step 5: Warming Tortillas
While the fajita mixture is roasting, warm your tortillas. Here are a few methods:
- Microwave: Wrap a stack of tortillas in a damp paper towel and microwave for 30-60 seconds until warm and pliable.
- Oven: Wrap tortillas in foil and place them in the oven during the last 5-10 minutes of roasting.
- Skillet: Warm tortillas one by one in a dry skillet over medium heat for about 15-30 seconds per side.
Once the chicken is cooked and the veggies are tender, your Sheet Pan Chicken Fajitas are ready to serve! This simple process makes it a perfect candidate for any weeknight dinner rotation.
Mastering the Easy Cleanup for Your Weeknight Dinner
The promise of easy cleanup is a major draw for any weeknight dinner, and these Sheet Pan Chicken Fajitas deliver on that promise. Traditional fajitas can often mean multiple pans – one for chicken, one for veggies, plus bowls for prep. The sheet pan method consolidates much of this, but a few extra tips can make cleanup virtually effortless.
H3: The Power of Parchment Paper or Foil
This is your number one weapon against a messy pan:
- Parchment Paper: My personal favorite for easy cleanup. It creates a non-stick surface, preventing food from baking onto the pan. After cooking, you can often just slide the parchment (and any bits) into the compost or trash, leaving your pan almost spotless.
- Heavy-Duty Aluminum Foil: Also a great option. If you use foil, especially if you anticipate some sticking or want to catch all juices, consider using heavy-duty foil. For extra insurance, you can lightly spray the foil with cooking spray before adding the ingredients.
- Coverage is Key: Ensure the parchment or foil covers the entire base of the sheet pan and ideally comes up the sides a bit. This catches any rogue juices or caramelized bits that might otherwise bake onto the pan.
H3: Smart Soaking (If Needed)
Even with a liner, sometimes a little bit of residue might make its way onto the pan, especially if juices bubble over.
- Immediate Action: If your pan does get dirty, try to address it while it's still warm (but not scalding hot). Add a squirt of dish soap and hot water to the pan and let it soak while you eat. This loosens any cooked-on food, making it much easier to wipe away later.
- Target Stubborn Spots: For any particularly caramelized or stuck-on bits (often sugars from the onions or peppers), a gentle scrub after soaking usually does the trick. Avoid harsh abrasive cleaners on non-stick pans if you opted out of a liner.
H3: Minimize Other Dishes
The sheet pan itself is the star of easy cleanup, but think about the other tools:
- One Large Mixing Bowl: Use one large bowl to toss the chicken, veggies, oil, and seasonings. This means only one bowl to wash from the prep stage.
- Cutting Board Strategy: If possible, cut your vegetables first, then your chicken, on the same cutting board to minimize cross-contamination concerns and reduce washing. Always wash the board thoroughly with hot, soapy water after cutting raw chicken.
- Serving Straight from the Pan (Almost!): While you can bring the hot sheet pan to the table (on a trivet!), it's often easier to transfer the cooked fajita mixture to a serving platter. This still means far fewer cooking dishes than traditional methods.
By incorporating these simple strategies, your Sheet Pan Chicken Fajitas will truly live up to their easy cleanup reputation, making your Tex-Mex weeknight dinner even more enjoyable from start to finish.
Customize Your Tex-Mex Feast: Variations and Additions
While the classic chicken, pepper, and onion combination for Sheet Pan Chicken Fajitas is a crowd-pleaser, one of the best aspects of this recipe is its versatility. You can easily adapt it to suit different tastes, dietary needs, or simply what you have on hand. Making it your own is part of the fun of a Tex-Mex weeknight dinner!
H3: Protein Swaps
Chicken is fantastic, but don't feel limited:
- Sheet Pan Shrimp Fajitas: Use large, peeled, and deveined shrimp. Shrimp cook much faster than chicken, so you might add them to the pan part-way through the vegetable roasting time, or roast them on a separate pan for just 5-8 minutes until pink and opaque.
- Sheet Pan Steak Fajitas: Use thinly sliced sirloin, flank, or skirt steak. Marinating the steak briefly in lime juice and spices can enhance tenderness and flavor. Cook time will be similar to chicken, depending on thickness.
- Pork Fajitas: Thinly sliced pork tenderloin also works well and cooks relatively quickly.
- Vegetarian/Vegan Delight:
- Firm Tofu or Tempeh: Press firm or extra-firm tofu to remove excess water, then cut into strips or cubes and toss with the seasoning. Tempeh can be crumbled or sliced.
- Black Beans & Corn: Add a can of rinsed and drained black beans and some frozen or fresh corn kernels to the vegetable mix for a hearty plant-based option.
- Mushroom Power: Portobello mushrooms, sliced thickly, or a mix of cremini and shiitake mushrooms, make a wonderfully "meaty" vegetarian fajita.
H3: Vegetable Variations
Expand beyond the classic bell pepper and onion trio:
- Mushrooms: Cremini, shiitake, or portobello mushrooms add an earthy depth.
- Zucchini or Yellow Squash: Slice into half-moons or sticks. They roast beautifully.
- Corn: Fresh corn cut off the cob or frozen corn kernels add sweetness.
- Jalapeños or Poblano Peppers: For those who like a bit of heat, add sliced jalapeños (remove seeds for less spice) or milder poblano peppers.
- Sweet Potatoes or Butternut Squash: Cube them small for faster cooking; they add a lovely sweetness and make the meal even more substantial. You may need to give them a head start in the oven before adding other ingredients.
H3: Spice Level and Flavor Twists
- Kick Up the Heat: Add more cayenne pepper, red pepper flakes, or a dash of your favorite hot sauce to the seasoning mix. Include fresh jalapeños or serrano peppers with the vegetables.
- Smoky Flavor: Use smoked paprika in your seasoning blend, or add a pinch of chipotle powder for a smoky heat.
- Citrus Zest: A bit of lime zest added to the seasoning or sprinkled over the finished dish brightens everything up.
Remember, when adding different vegetables, consider their cooking times. Denser vegetables like sweet potatoes might need to go into the oven a bit earlier than softer ones like zucchini. Experimentation is key to finding your perfect Sheet Pan Chicken Fajitas combination for an exciting Tex-Mex weeknight dinner with easy cleanup.
Serving Your Sheet Pan Chicken Fajitas Like a Pro
Once your Sheet Pan Chicken Fajitas are perfectly roasted, sizzling with Tex-Mex aroma, it's time for the best part: assembling and enjoying them! Presentation and the right accompaniments can elevate your simple weeknight dinner into a festive experience.
H3: The Essential Toppings Bar
Setting up a "toppings bar" is half the fun of fajitas. It allows everyone to customize their meal to their liking. Here are some classic and creative ideas:
- Guacamole: Creamy, fresh guacamole is a must for many. Homemade is best, but store-bought works in a pinch.
- Salsa: Offer a variety if you can – a classic pico de gallo, a roasted tomato salsa, or a spicier salsa verde.
- Sour Cream or Greek Yogurt: A dollop adds coolness and creaminess. Plain Greek yogurt is a healthier alternative with a similar tang.
- Shredded Cheese: Monterey Jack, cheddar, or a Mexican blend are popular choices.
- Fresh Cilantro: Chopped fresh cilantro adds a burst of freshness.
- Lime Wedges: A squeeze of fresh lime juice over everything brightens the flavors immensely. This is non-negotiable for authentic Tex-Mex taste!
- Pickled Jalapeños or Onions: For an extra kick and tangy contrast.
- Shredded Lettuce: Adds a nice crunch.
H3: Presentation Matters (Even on a Weeknight!)
- Sizzling Transfer: While you can serve directly from the sheet pan (placed on a heatproof surface), transferring the chicken and vegetable mixture to a warm serving platter or a cast iron skillet (if you have one that can be preheated) can create a more "restaurant-style" feel.
- Warm Tortillas: Keep your tortillas warm throughout the meal. A tortilla warmer is great, but a clean kitchen towel wrapped around the stack works too.
- Organized Toppings: Arrange your toppings in small bowls for easy access. This makes the meal feel more special and organized, even for a casual weeknight dinner.
H3: Assembling the Perfect Fajita
There's no wrong way, but here's a common approach:
- Take a warm tortilla.
- Spoon a generous amount of the sheet pan chicken fajita mixture down the center.
- Add your desired toppings.
- Fold or roll, and enjoy!
By paying a little attention to how you serve them, your easy cleanup sheet pan chicken fajitas can feel like a true Tex-Mex celebration any night of the week.
Beyond the Pan: Completing Your Tex-Mex Weeknight Dinner
While the Sheet Pan Chicken Fajitas are undeniably the star of the show, a few simple side dishes can round out your Tex-Mex weeknight dinner and make it even more satisfying. The good news is that these sides can often be prepared with minimal extra effort, keeping the spirit of an easy cleanup meal alive.
H3: Classic Rice and Beans
These are quintessential Tex-Mex accompaniments:
- Cilantro-Lime Rice: This is incredibly easy to make. Simply stir fresh chopped cilantro and a squeeze of lime juice into cooked white or brown rice. For extra flavor, cook the rice in chicken or vegetable broth instead of water.
- Seasoned Black Beans or Pinto Beans:
- Quick Canned Option: Rinse and drain a can of black beans or pinto beans. Heat them on the stovetop or in the microwave with a pinch of cumin, chili powder, and garlic powder. A squeeze of lime juice at the end brightens them up.
- Refried Beans: Canned refried beans are a super quick option. Look for traditional or vegetarian varieties.
H3: Fresh and Light Salads
A simple salad can provide a refreshing contrast to the rich flavors of the fajitas:
- Simple Green Salad: Toss mixed greens with a light vinaigrette (a lime-based dressing works well). Cherry tomatoes and thinly sliced red onion are great additions.
- Corn and Avocado Salad: Combine corn kernels (canned, frozen and thawed, or fresh), diced avocado, chopped red onion, cilantro, and a lime juice dressing. This can often double as a topping too!
- Slaw: A tangy coleslaw, perhaps with a cilantro-lime dressing instead of traditional mayonnaise, adds a nice crunch.
H3: Other Quick Tex-Mex Sides
- Elote (Mexican Street Corn) Inspired: If you have a few extra minutes, grilled or roasted corn on the cob slathered with a mixture of mayonnaise, cotija cheese, chili powder, and lime juice is incredible. For a quicker version, use canned or frozen corn, sauté it, and mix in the toppings.
- Chips and Salsa/Guacamole: While these are also toppings, having a larger bowl of chips with salsa and guacamole on the side is always a welcome addition for scooping and dipping.
The key is to choose sides that don't add significantly to your cooking time or cleanup. Many of these can be prepped while the sheet pan chicken fajitas are roasting, ensuring your entire Tex-Mex weeknight dinner comes together smoothly and efficiently, true to the promise of an easy cleanup meal.
Storing and Reheating Your Delicious Leftovers
One of the great things about making a batch of Sheet Pan Chicken Fajitas is that leftovers are fantastic! Whether you're planning for lunch the next day or simply made more than you could eat, storing and reheating them properly will ensure they taste almost as good as when freshly made. This extends the convenience of your easy cleanup weeknight dinner.
H3: Proper Storage for Maximum Freshness
- Cool Completely: Allow the cooked chicken and vegetable mixture to cool to room temperature before storing. Storing hot food directly in the refrigerator can raise the temperature inside the fridge and promote bacterial growth.
- Airtight Containers: Transfer the leftover fajita mixture to an airtight container. This helps maintain freshness and prevents the flavors from mingling with other items in your fridge.
- Separate Components (Optional but Recommended):
- Store leftover tortillas separately in a zip-top bag or their original packaging to prevent them from getting soggy.
- Keep toppings like guacamole, sour cream, and fresh salsa in their own containers. Guacamole is best stored with plastic wrap pressed directly onto its surface to minimize browning.
- Refrigerate Promptly: Store in the refrigerator for up to 3-4 days.
H3: Best Ways to Reheat Sheet Pan Chicken Fajitas
The goal when reheating is to warm the fajitas through without drying out the chicken or making the vegetables mushy.
- Skillet (Recommended for Best Texture):
- Heat a lightly oiled skillet over medium heat.
- Add the leftover chicken and vegetable mixture.
- Sauté for a few minutes, stirring occasionally, until heated through. This method can help revive some of the char and texture.
- Oven or Toaster Oven:
- Preheat your oven or toaster oven to around 350°F (175°C).
- Spread the leftover fajita mixture on a baking sheet (perhaps lined again for easy cleanup!).
- Heat for 10-15 minutes, or until warmed through. You can cover it loosely with foil if you're concerned about it drying out.
- Microwave (Quickest Option):
- Place the fajita mixture in a microwave-safe dish.
- Cover loosely to prevent splattering.
- Heat in 30-60 second intervals, stirring in between, until warmed through. Be careful not to overcook, as this can make the chicken tough.
- Reheating Tortillas:
- Microwave: Wrap in a damp paper towel and heat for 15-30 seconds.
- Skillet: Warm in a dry skillet over medium heat for a few seconds per side.
By following these storage and reheating tips, you can enjoy your flavorful Tex-Mex meal beyond the initial weeknight dinner, making your efforts in the kitchen go even further.
Frequently Asked Questions about Easy Cleanup Sheet Pan Chicken Fajitas
Here are answers to some common questions you might have about making delicious and easy cleanup sheet pan chicken fajitas for your next weeknight dinner.
H3: What's the best chicken for sheet pan fajitas?
Both boneless, skinless chicken breasts and chicken thighs work well. Chicken thighs are generally more forgiving as they contain more fat, which helps them stay moist and tender during roasting. Chicken breasts are a leaner option but can dry out if overcooked, so be mindful of cooking times and slice them uniformly. For the best flavor and juiciness, many prefer thighs for this Tex-Mex dish.
H3: Can I prep components in advance for an even quicker weeknight dinner?
Absolutely! Prepping ahead is a fantastic way to make this weeknight dinner even faster.
- Vegetables: You can slice your bell peppers and onions a day or two in advance. Store them in an airtight container in the refrigerator.
- Chicken: Slice the chicken and store it in a separate airtight container in the fridge for up to a day.
- Seasoning: Mix your DIY fajita seasoning blend ahead of time and store it in an airtight jar.
With these components ready, assembling your sheet pan chicken fajitas will take just minutes.
H3: How do I prevent my fajitas from being dry or soggy?
- To Prevent Dryness (especially with chicken breast): Don't overcook the chicken. Use a meat thermometer to ensure it reaches 165°F (74°C) but not much higher. Slicing the chicken into slightly thicker strips (around 1/2 inch) can also help. Using chicken thighs reduces this risk. Ensure you've used enough oil to coat the ingredients.
- To Prevent Sogginess: The main culprit is usually overcrowding the pan. When ingredients are too close together, they steam instead of roast. Use a large enough sheet pan so everything can be in a single layer with some space, or use two pans. Also, ensure your oven is preheated to a high enough temperature (400-425°F or 200-220°C).
H3: Can I make these sheet pan chicken fajitas vegetarian?
Yes, easily! For a hearty vegetarian version, substitute the chicken with:
- Firm or extra-firm tofu: Press it, then cut into strips and season.
- Portobello mushrooms: Sliced thickly.
- A mix of vegetables: Add more bell peppers, onions, plus zucchini, corn, or even black beans (add beans towards the end of cooking time or mix in after roasting).
The easy cleanup and Tex-Mex flavor profile work wonderfully with plant-based ingredients.
H3: What are some essential tips for the easiest cleanup?
The key to easy cleanup for these sheet pan chicken fajitas is preparation:
- Line your sheet pan: Use parchment paper (best option) or heavy-duty aluminum foil. This prevents food from sticking and burning onto the pan.
- One bowl mixing: Toss all your ingredients (chicken, veggies, oil, seasoning) in one large bowl before transferring to the sheet pan.
- Soak if necessary: If anything does stick, soak the pan in hot, soapy water immediately after use while you eat.
H3: How can I add more authentic Tex-Mex flavor?
Beyond a good fajita seasoning, consider these:
- Fresh Lime Juice: Squeeze generously over the cooked fajitas before serving.
- Cilantro: Add fresh, chopped cilantro as a garnish.
- Smoked Paprika: Use it in your seasoning for a deeper, smoky flavor.
- Cumin: Ensure your seasoning has a good amount of cumin, a hallmark of Tex-Mex cuisine.
- Char: Don't be afraid to let your veggies get a little bit of char in the oven (or a quick broil at the end, watching carefully). This adds a lot of flavor. For even more depth, consider a resource that dives into regional Mexican or Tex-Mex ingredients, like some articles found on Serious Eats (general link to ingredient guides).