Tired of pizza cravings derailing your healthy eating goals? Imagine biting into a delicious, satisfying pizza that’s not only guilt-free but also aligns perfectly with your low-carb and gluten-free lifestyle. This recipe for Cauliflower Pizza Crust, Low-Carb, Gluten-Free, Healthy Pizza is your answer! We transform humble cauliflower into a sturdy, flavorful base by ricing it, thoroughly squeezing out excess moisture, then binding it with egg and cheese (or your preferred binder) before pre-baking to golden perfection. Get ready to discover how to create this fantastic pizza base, troubleshoot common issues, and unlock a world of healthy pizza possibilities right in your own kitchen.
Table of Contents
- Why You’ll Love This Cauliflower Pizza Crust
- Gathering Your Ingredients: The Building Blocks of a Great Cauliflower Pizza Crust
- Essential Kitchen Tools for Perfect Cauliflower Pizza Crust
- Mastering the Method: Step-by-Step to Your Best Cauliflower Pizza Crust
- The Secret Weapon: Achieving a Crispy, Not Soggy, Cauliflower Pizza Crust
- Pro Tips & Troubleshooting for Your Cauliflower Pizza Crust Journey
- Delicious & Healthy Topping Ideas for Your Cauliflower Masterpiece
- Nutritional Insights: What Makes This Cauliflower Pizza Crust a Winner?
- Storing and Reheating Your Cauliflower Pizza Crust
- Frequently Asked Questions about Cauliflower Pizza Crust, Low-Carb, Gluten-Free, Healthy Pizza
Why You’ll Love This Cauliflower Pizza Crust
The buzz around cauliflower pizza crust isn’t just hype; it’s a genuine culinary revolution for health-conscious foodies. If you’re looking for a pizza experience that doesn’t compromise your dietary goals, this Cauliflower Pizza Crust, Low-Carb, Gluten-Free, Healthy Pizza is a game-changer.
Embracing Low-Carb Living
Traditional pizza crusts, made from wheat flour, are packed with carbohydrates. For those following a low-carb or ketogenic diet, this can make pizza a forbidden fruit. Our cauliflower crust slashes the carb count dramatically, allowing you to indulge without spiking your blood sugar or kicking you out of ketosis. It’s a fantastic way to enjoy a pizza night while staying true to your low-carb commitments.
A Gluten-Free Delight
Celiac disease, gluten sensitivity, or simply choosing to avoid gluten can make finding a good pizza crust challenging. Cauliflower is naturally gluten-free, making this crust an excellent option. You no longer have to settle for expensive, often underwhelming, store-bought gluten-free crusts. Homemade means you control the ingredients and the delicious outcome.
Packed with Healthy Goodness
Beyond being low-carb and gluten-free, cauliflower itself is a nutritional powerhouse. It’s rich in vitamins C and K, fiber, and antioxidants. Swapping out a flour-based crust for a vegetable-based one means you’re sneaking in extra nutrients and fiber, making your “indulgence” surprisingly virtuous. This healthy pizza option doesn’t skimp on flavor or satisfaction.
Surprisingly Delicious and Versatile
Let’s be honest, some “healthy alternatives” can be a letdown. Not this one. When prepared correctly, a cauliflower pizza crust is wonderfully savory, with a slightly nutty flavor that complements a wide array of toppings. It holds up well and can be customized with herbs and spices to match your favorite pizza profiles.
Gathering Your Ingredients: The Building Blocks of a Great Cauliflower Pizza Crust
The beauty of this recipe lies in its simplicity and the wholesomeness of its components. You likely have many of these on hand, especially if you’re accustomed to low-carb or gluten-free cooking.
Core Components:
- Fresh Cauliflower: One medium to large head is typically enough for a standard 10-12 inch pizza crust. Opt for a firm, blemish-free head. You can also use pre-riced cauliflower to save time, but ensure it’s fresh and not overly wet.
- Binder: This is crucial for holding the crust together.
- Egg: One large egg is standard. It provides structure and richness.
- Cheese: Finely grated Parmesan, mozzarella, or a blend work wonders. Cheese not only binds but also adds incredible flavor and helps with crisping. About 1/2 to 1 cup is a good starting point.
- Seasonings:
- Salt and Pepper: Essential for flavor.
- Italian Herbs: Dried oregano, basil, garlic powder, or an Italian seasoning blend enhance the “pizza” taste. Feel free to get creative!
Optional Enhancements:
- Almond Flour or Coconut Flour: A tablespoon or two can help absorb excess moisture and provide a slightly more bread-like texture. Use sparingly, especially with coconut flour, as it’s very absorbent.
- Nutritional Yeast: For a cheesy flavor without dairy, or to enhance the existing cheese flavor. Great for those looking for a dairy-reduced option (though you’d still need an egg alternative for fully dairy-free/vegan).
- Psyllium Husk: Another excellent binder, particularly for egg-free versions. Use a small amount (e.g., 1 teaspoon) as it absorbs a lot of liquid.
When selecting your cheese, consider pre-shredded for convenience, but shredding your own block cheese often results in better melting and less anti-caking agents, which can sometimes affect texture. For mozzarella, a low-moisture, part-skim variety is usually best to prevent an overly greasy or soggy crust.
Essential Kitchen Tools for Perfect Cauliflower Pizza Crust
Having the right tools will make the process smoother and contribute significantly to the success of your Cauliflower Pizza Crust, Low-Carb, Gluten-Free, Healthy Pizza.
- Food Processor: This is the easiest and quickest way to rice the cauliflower. If you don’t have one, a box grater (using the medium holes) will work, but it’s more labor-intensive.
- Clean Kitchen Towel, Cheesecloth, or Nut Milk Bag: Absolutely essential for wringing out the moisture from the riced cauliflower. This step is non-negotiable for a crispy crust. A sturdy, clean dish towel that you don’t mind potentially staining slightly is often the most practical.
- Large Mixing Bowl: For combining all your crust ingredients.
- Baking Sheet: A large, flat baking sheet is needed.
- Parchment Paper: Prevents the crust from sticking to the baking sheet and makes cleanup easier. Do not use wax paper, as it will melt and smoke in the oven.
- Spatula: For spreading and shaping the crust.
- Measuring Cups and Spoons: For accurate ingredient measurement.
- (Optional) Pizza Stone or Steel: If you have one, preheating it in the oven can lead to an even crispier bottom crust. You would bake the crust (on parchment paper) directly on the hot stone or steel.
Don’t be intimidated if you don’t have every single “optional” item. The core tools – food processor (or grater), towel, bowl, baking sheet, and parchment paper – are the true workhorses here. Investing in a good quality cheesecloth or nut milk bag can be worthwhile if you plan on making cauliflower crust regularly, as they are very efficient at moisture removal.
Mastering the Method: Step-by-Step to Your Best Cauliflower Pizza Crust
Ready to create a delicious foundation for your favorite toppings? Follow these steps carefully, especially the moisture-removal part, and you’ll be well on your way to enjoying a fantastic low-carb, gluten-free, healthy pizza.
Phase 1: Preparing the Cauliflower “Rice”
- Wash and Chop: Start with one medium-large head of cauliflower (about 2-2.5 pounds). Wash it thoroughly and pat it dry. Remove the green leaves and the tough core. Chop the cauliflower into florets that are small enough to fit into your food processor.
- Rice the Cauliflower: Working in batches if necessary, pulse the cauliflower florets in a food processor until they resemble coarse rice or couscous. Be careful not to over-process into a paste. If you don’t have a food processor, use the medium-sized holes on a box grater. You should end up with approximately 3-4 cups of riced cauliflower.
- Cook the Cauliflower (Optional but Recommended): This step helps to soften the cauliflower and release more moisture. You have two main options:
- Microwave: Place the riced cauliflower in a microwave-safe bowl and microwave on high for 4-5 minutes, or until tender. No need to add water.
- Stovetop: Heat a large, dry skillet over medium heat. Add the riced cauliflower and cook, stirring occasionally, for 5-8 minutes, until it softens.
Let the cooked cauliflower cool for at least 10-15 minutes. It needs to be cool enough to handle for the next crucial step.
Phase 2: The All-Important Squeeze
This is the make-or-break step for a crispy crust!
- Transfer to Towel: Once the cauliflower rice has cooled sufficiently, transfer it to the center of a clean, thin kitchen towel, a double layer of cheesecloth, or a nut milk bag.
- Squeeze, Squeeze, Squeeze: Gather the corners of the towel/cheesecloth and twist tightly. Squeeze out as much liquid as humanly possible over a sink or bowl. You’ll be amazed at how much water comes out. Keep squeezing and re-twisting until very little liquid is released. The drier the cauliflower, the crispier your crust will be. This might take a few minutes and a bit of arm strength, but it’s worth it! The resulting cauliflower pulp should be quite compact and significantly reduced in volume.
Phase 3: Creating and Shaping the Dough
- Preheat Oven: Preheat your oven to 400-425°F (200-220°C). If using a pizza stone or steel, place it in the oven while it preheats. Line a baking sheet with parchment paper.
- Combine Ingredients: In a large mixing bowl, combine the thoroughly squeezed cauliflower, one large egg, 1/2 to 1 cup of finely grated cheese (like mozzarella and Parmesan), 1/2 teaspoon salt, 1/4 teaspoon black pepper, and 1 teaspoon of Italian seasoning or your preferred herbs (garlic powder, oregano, basil).
- Mix Well: Use your hands or a sturdy spoon to mix all the ingredients thoroughly until a sticky “dough” forms. Ensure the egg and cheese are evenly distributed.
- Shape the Crust: Transfer the cauliflower mixture to the center of your parchment-lined baking sheet. Using your hands or a spatula, press and shape the mixture into a thin, even circle or rectangle, about 1/8 to 1/4 inch thick. Aim for a diameter of 10-12 inches for a round crust. Make the edges slightly thicker if you like a more defined “crust” rim.
Phase 4: Pre-Baking the Crust
- First Bake: Carefully slide the parchment paper with the crust onto the preheated baking sheet (or directly onto the hot pizza stone/steel). Bake for 15-20 minutes, or until the crust is golden brown, firm to the touch, and the edges are nicely crisped. Baking times can vary depending on your oven and crust thickness.
- Cool Slightly (Optional): Some find that letting the crust cool for a few minutes before adding toppings can help maintain crispiness.
Your cauliflower pizza crust is now ready for toppings! Remember not to overload it, especially with wet ingredients, to keep it from getting soggy.
The Secret Weapon: Achieving a Crispy, Not Soggy, Cauliflower Pizza Crust
The dreaded soggy cauliflower pizza crust is a common complaint, but it’s entirely avoidable! If you dream of a healthy pizza base that can hold its own, these are the non-negotiable secrets.
Moisture is the Enemy
We can’t stress this enough: excess moisture is the primary culprit behind a floppy, disappointing cauliflower crust.
- Thorough Squeezing: As detailed in the step-by-step guide, wringing out every possible drop of water from the cooked and cooled riced cauliflower is paramount. Don’t rush this step. Use a thin, strong kitchen towel or multiple layers of cheesecloth for best results.
- Pre-Cooking the Cauliflower: Steaming or microwaving the riced cauliflower before squeezing helps release more internal moisture than using it raw. Ensure it cools down before squeezing to avoid burns and to allow for a better grip.
The Right Binder Ratio
While binders like egg and cheese are essential for holding the crust together, too much of a wet binder can contribute to sogginess.
- Egg: Typically, one large egg is sufficient for a crust made from one medium head of cauliflower.
- Cheese: Use finely grated, low-moisture cheeses. Harder cheeses like Parmesan contribute to crispiness and flavor without adding excessive moisture. While mozzarella is great for meltiness, ensure it’s a low-moisture variety.
Baking Strategy for Crispiness
How you bake your cauliflower pizza crust also plays a significant role.
- High Heat: A hotter oven (400-425°F or 200-220°C) helps to evaporate remaining moisture quickly and encourages browning and crisping.
- Parchment Paper, Not Foil: Parchment paper allows moisture to escape from the bottom of the crust, whereas foil can trap it.
- Pre-Bake Thoroughly: Don’t skimp on the initial baking time before adding toppings. The crust should be golden brown and fairly firm. This creates a barrier against moisture from sauces and toppings.
- Pizza Stone or Steel: If you have one, preheating it in the oven and baking the crust directly on it (with parchment paper underneath) provides intense bottom heat, leading to a much crispier result.
- Elevated Baking (Optional): Some people have success baking the crust on a wire rack placed on top of a baking sheet (after the initial shaping and firming bake) to allow air to circulate all around.
Mindful Toppings
Even a perfectly baked crust can become soggy if overloaded with wet toppings.
- Go Light on Sauce: Use a moderate amount of a thicker pizza sauce.
- Pre-Cook Wet Toppings: Ingredients like mushrooms or spinach can release a lot of water when baked. Sauté them first to remove excess moisture before adding them to your pizza.
By focusing on these key areas, you’ll significantly increase your chances of achieving that coveted crispy, sturdy low-carb cauliflower pizza crust every single time.
Pro Tips & Troubleshooting for Your Cauliflower Pizza Crust Journey
Even with the best recipe, sometimes things can go slightly awry, or you might want to experiment. Here are some pro tips and troubleshooting advice to help you perfect your Cauliflower Pizza Crust, Low-Carb, Gluten-Free, Healthy Pizza.
Flavor Enhancements & Variations
- Spice it Up: Don’t be afraid to experiment with seasonings in the crust itself. A pinch of red pepper flakes for heat, smoked paprika for depth, or even a dash of onion powder can add new dimensions.
- Garlic Lover’s Dream: Mix a teaspoon of freshly minced garlic or 1/2 teaspoon of garlic powder into the cauliflower mixture for an extra aromatic kick.
- Herby Goodness: Fresh herbs like finely chopped rosemary or thyme can be incorporated into the dough for a more gourmet flavor profile.
Common Issues and Solutions
- Crust is Too Crumbly/Doesn’t Hold Together:
- Not Enough Binder: You might need a bit more cheese or ensure your egg was large enough.
- Cauliflower Too Dry (Less Common): While rare, if you over-squeezed to the point of absolute desiccation and used very little cheese, it might lack cohesion. Usually, the issue is too much moisture, not too little.
- Didn’t Press Firmly Enough: When shaping the crust, make sure to compact it well.
- Crust Sticks to Parchment Paper:
- Parchment Quality: Ensure you’re using good quality parchment paper.
- Not Baked Long Enough: The crust might still be too moist underneath. Give it a few more minutes.
- Too Much Moisture: Refer back to the squeezing and baking tips.
- Crust is Soggy (The Classic Problem):
- This is almost always due to insufficient moisture removal from the cauliflower. Re-read “The Secret Weapon” section carefully!
- Overloading with wet toppings or sauce.
- Oven not hot enough or crust not pre-baked long enough.
- Edges Burn Before Center is Cooked:
- Your oven might have hot spots, or the crust is uneven in thickness. Try to make the crust as even as possible.
- If edges brown too quickly, you can loosely tent them with foil for the remainder of the pre-bake.
Making Ahead & Batching
- Pre-Riced Cauliflower: You can rice the cauliflower and store it in an airtight container in the fridge for 2-3 days before cooking and squeezing it.
- Baked Crusts: You can pre-bake the crusts, let them cool completely, then stack them with parchment paper in between. Store in an airtight container in the fridge for up to 3 days or freeze for up to 1-2 months. Thaw frozen crusts in the fridge before topping and baking.
Can I Make it Vegan?
Yes, with some adjustments!
- Egg Substitute: A flax egg (1 tablespoon ground flaxseed + 3 tablespoons water, let sit for 5-10 minutes) or a commercial egg replacer can work. Psyllium husk (1-2 teaspoons mixed with a little water) is also a good binder.
- Cheese Substitute: Use your favorite vegan mozzarella and parmesan shreds. Nutritional yeast (2-3 tablespoons) will add a cheesy, umami flavor.
The texture might be slightly different from the egg/dairy cheese version, but still delicious and a great healthy pizza option.
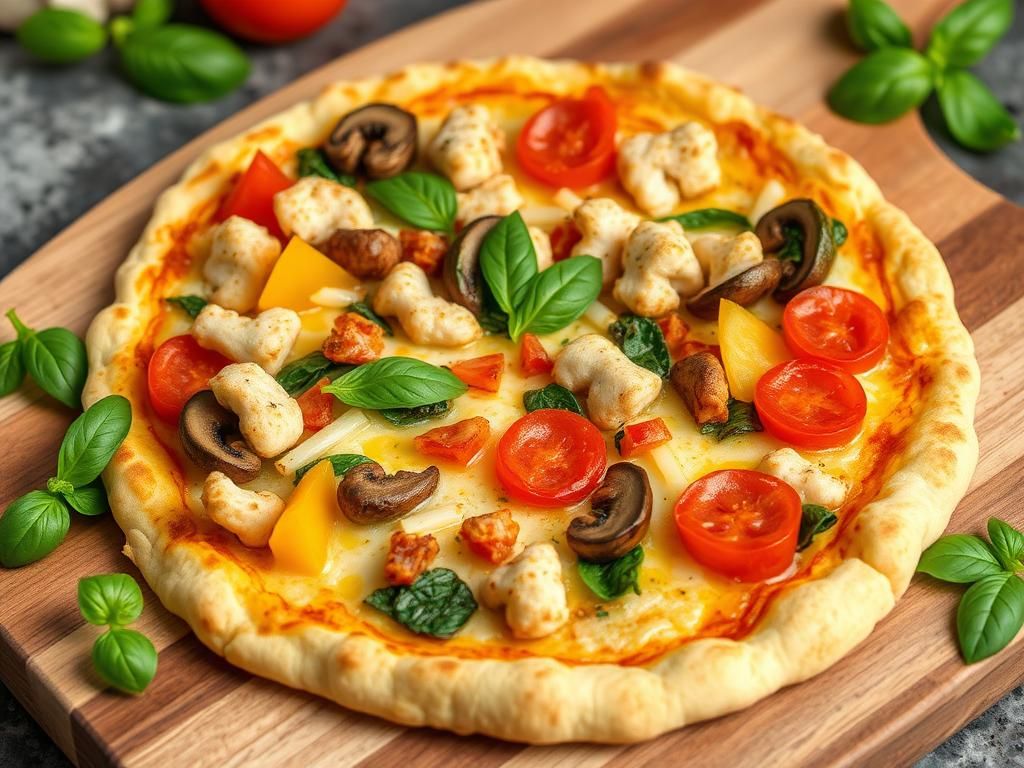
Delicious & Healthy Topping Ideas for Your Cauliflower Masterpiece
Now for the fun part! Your perfectly baked cauliflower pizza crust is a blank canvas. Since you’ve opted for a healthy base, let’s keep the toppings vibrant, fresh, and nutritious too.
Classic Combinations with a Healthy Twist:
- Margherita: Simple tomato sauce (look for low-sugar options), fresh mozzarella slices (or low-moisture shredded), fresh basil leaves, and a drizzle of extra virgin olive oil after baking.
- Veggie Supreme: Tomato sauce, a sprinkle of mozzarella, and a colorful array of bell peppers (all colors!), red onion, mushrooms (sautéed first to reduce moisture), black olives, and perhaps some artichoke hearts.
- Pesto Chicken: Basil pesto as the sauce (go easy, it’s rich), cooked shredded chicken breast, sun-dried tomatoes (oil-packed, drained), and a sprinkle of goat cheese or feta.
Low-Carb & Keto-Friendly Toppings:
- Meat Lover’s (Healthy Edition): Tomato sauce, mozzarella, lean cooked ground beef or turkey, uncured pepperoni or turkey pepperoni, and perhaps some sautéed onions.
- Spinach and Feta: Garlic-infused olive oil base (instead of tomato sauce), wilted spinach (squeezed dry!), crumbled feta cheese, and Kalamata olives.
- Buffalo Chicken: Mix cooked shredded chicken with a sugar-free buffalo sauce. Use a light ranch or blue cheese dressing as the base (or skip), top with the chicken, mozzarella, and a sprinkle of green onions.
Creative & Flavorful Ideas:
- BBQ Chicken: Sugar-free BBQ sauce as the base, cooked shredded chicken, red onion slices, cilantro, and mozzarella or smoked gouda.
- Mediterranean Delight: Hummus or a thin layer of garlic-tahini sauce as the base, topped with chopped cucumbers, tomatoes, Kalamata olives, red onion, fresh parsley, and a sprinkle of feta after baking for freshness.
- Mushroom & Truffle: Sautéed mixed mushrooms (cremini, shiitake), a drizzle of truffle oil (use sparingly!), mozzarella, and perhaps some fresh thyme.
Tips for Topping Success:
- Don’t Overload: A common mistake that leads to a floppy crust or uneven cooking. Less is often more.
- Pre-Cook Meats: Always use fully cooked meats.
- Manage Moisture: As mentioned, sauté watery vegetables like mushrooms or zucchini first. Pat ingredients like fresh mozzarella dry.
- Cheese Under Toppings: Some people like to put a thin layer of cheese directly on the crust before the sauce to create a moisture barrier.
Enjoy experimenting to find your signature healthy cauliflower pizza!
Nutritional Insights: What Makes This Cauliflower Pizza Crust a Winner?
Choosing a Cauliflower Pizza Crust, Low-Carb, Gluten-Free, Healthy Pizza isn’t just about fitting dietary restrictions; it’s about making a genuinely nutritious choice. Let’s look at why this crust stands out.
Cauliflower, the star ingredient, is a cruciferous vegetable renowned for its health benefits. According to Healthline, a trusted source for nutritional information, cauliflower is:
- Low in Calories, High in Nutrients: It packs a significant amount of vitamins and minerals into very few calories. It’s an excellent source of Vitamin C, Vitamin K, folate, and Vitamin B6.
- High in Fiber: Fiber is crucial for digestive health, promoting regularity, and helping you feel full, which can aid in weight management. A cauliflower crust contributes significantly more fiber than a traditional white flour crust.
- Rich in Antioxidants: Cauliflower contains antioxidants like glucosinolates and isothiocyanates, which may help protect against chronic diseases by reducing inflammation and protecting cells from damage.
- Supports Heart Health: Sulforaphane, a compound found in cauliflower, has been linked to improved blood pressure and kidney function. The fiber content also contributes to heart health by helping to manage cholesterol levels.
By swapping out refined flour for cauliflower, you are:
- Drastically Reducing Carbohydrates: This is key for blood sugar management, ketogenic diets, and general low-carb lifestyles.
- Eliminating Gluten: Essential for individuals with celiac disease or gluten sensitivity.
- Increasing Vegetable Intake: Many of us struggle to get enough vegetables in our diet. This crust makes it easy and delicious!
When combined with mindful toppings – lean proteins, plenty of other vegetables, and moderate amounts of healthy fats from cheese or olive oil – your cauliflower pizza becomes a well-rounded, satisfying, and genuinely healthy pizza meal. It’s a testament to how creative cooking can make nutritious eating enjoyable and sustainable.
Storing and Reheating Your Cauliflower Pizza Crust
Proper storage and reheating can help you enjoy your delicious cauliflower pizza crust creations even a day or two later, maintaining as much of that desirable texture as possible.
Storing Baked Crusts (No Toppings)
If you’ve pre-baked crusts to use later:
- Cool Completely: Allow the baked crusts to cool entirely on a wire rack. This prevents condensation from forming, which can make them soggy.
- Wrap or Container:
- Refrigerator: Stack the cooled crusts with a piece of parchment paper between each one to prevent sticking. Place them in an airtight container or wrap the stack tightly in plastic wrap or foil. They can be stored in the refrigerator for up to 3-4 days.
- Freezer: For longer storage, wrap each cooled crust individually in plastic wrap, then in foil, or place them in a freezer-safe zip-top bag (with parchment in between if stacking). They can be frozen for 1-2 months.
Storing Leftover Pizza (With Toppings)
- Cool Completely: Let the pizza cool down to room temperature.
- Refrigerate: Place slices in an airtight container or wrap them well. Store in the refrigerator for up to 2-3 days. Note that the crust may soften slightly upon refrigeration due to moisture from toppings.
Reheating for Best Results
The goal when reheating is to restore crispness.
- Oven or Toaster Oven (Recommended): This is the best method. Preheat your oven or toaster oven to 350-375°F (175-190°C).
- For Crusts Only (from fridge or thawed): Place the crust directly on the oven rack or on a baking sheet. Bake for 5-10 minutes, or until heated through and crisped up.
- For Leftover Pizza Slices: Place slices on a baking sheet (optionally lined with parchment for easy cleanup) or directly on the oven rack for a crispier bottom. Bake for 8-12 minutes, or until the cheese is bubbly and the crust is re-crisped.
- Air Fryer: An air fryer works wonderfully for reheating individual slices or small crusts. Set it to around 350°F (175°C) and heat for 3-5 minutes, keeping an eye on it to prevent burning.
- Skillet/Frying Pan: You can reheat slices in a dry skillet over medium-low heat. Cover the pan for the first few minutes to help the toppings heat through, then uncover to allow the bottom to crisp up. This method works best for a few slices at a time.
- Microwave (Least Recommended for Crispness): While quick, microwaving will likely result in a softer, sometimes chewy crust. If you must use it, heat in short intervals. You can try placing a paper towel underneath to absorb some moisture.
Avoid reheating multiple times if possible, as this can degrade the texture. With these tips, your leftover low-carb, gluten-free, healthy pizza can be almost as good as when it was freshly made!
Frequently Asked Questions about Cauliflower Pizza Crust, Low-Carb, Gluten-Free, Healthy Pizza
Here are answers to some common questions people have when venturing into the world of homemade cauliflower pizza crusts.
Is cauliflower pizza crust actually healthy?
Answer: Yes, generally it is much healthier than traditional flour-based pizza crusts. Cauliflower itself is packed with vitamins, minerals, and fiber while being low in calories and carbs. When made with wholesome binders like egg and cheese (or vegan alternatives) and paired with nutritious toppings, a Cauliflower Pizza Crust, Low-Carb, Gluten-Free, Healthy Pizza can be a very nutritious meal. The key is mindful preparation and topping choices.
How do I make my cauliflower pizza crust crispy?
Answer: The number one secret is removing as much moisture as possible from the riced cauliflower by squeezing it thoroughly in a clean kitchen towel or cheesecloth after it’s been cooked and cooled. Other important factors include using a hot oven (400-425°F / 200-220°C), pre-baking the crust until golden and firm before adding toppings, and not overloading it with wet ingredients. Using a pizza stone can also enhance crispiness.
Can I make cauliflower pizza crust ahead of time?
Answer: Absolutely! You can pre-bake the crusts, let them cool completely, and then store them. Stack them with parchment paper in between in an airtight container in the refrigerator for up to 3-4 days, or freeze them for 1-2 months. Thaw frozen crusts in the fridge before topping and baking with your favorite ingredients.
What can I use instead of egg in cauliflower pizza crust?
Answer: If you need an egg-free or vegan cauliflower pizza crust, you have a few options. A “flax egg” (1 tablespoon ground flaxseed mixed with 3 tablespoons water, rested for 5-10 minutes) works well. You can also try a commercial egg replacer according to package directions, or about 1-2 teaspoons of psyllium husk powder mixed with a little water to form a gel. Remember to also use dairy-free cheese for a fully vegan version.
Why is my cauliflower pizza crust soggy?
Answer: Soggy crust is almost always due to excess moisture. This could mean you didn’t squeeze enough water out of the riced cauliflower, your oven wasn’t hot enough, you didn’t pre-bake the crust sufficiently before adding toppings, or you used too many watery toppings or too much sauce. Go back to basics: squeeze thoroughly, bake hot, and pre-bake well!
Does cauliflower pizza crust taste like cauliflower?
Answer: When prepared correctly, the cauliflower flavor is quite mild and often takes on the flavors of the cheese, herbs, and toppings used. While there’s a subtle, slightly nutty undertone from the cauliflower, most people find it doesn’t scream “cauliflower!” especially once loaded with delicious pizza toppings. The texture is different from traditional bread crusts, but it’s very satisfying in its own right as a healthy pizza base.