Imagine pulling a perfectly baked Chocolate Lava Cake from the oven, its delicate crust hinting at the river of rich, molten chocolate waiting to erupt with the first touch of your spoon. This guide transforms that dream into delicious reality. You're about to master the art of this classic individual dessert, from selecting the right chocolate to achieving that coveted gooey center. Our straightforward recipe—combining quality chocolate, butter, eggs, a touch of sugar, and minimal flour—demystifies the baking process. Get ready to uncover essential tips, troubleshoot common pitfalls, and explore decadent variations that will make these molten delights your go-to treat for any occasion.
Table of Contents
- Why Chocolate Lava Cakes Are the Ultimate Individual Dessert
- Mastering the Molten Center: The Science Behind Perfect Chocolate Lava Cakes
- Key Ingredients and Their Roles in Your Molten Chocolate Masterpiece
- Step-by-Step Guide to Baking Irresistible Chocolate Lava Cakes
- Pro Tips & Tricks for Flawless Molten Chocolate Individual Desserts Every Time
- Troubleshooting Common Chocolate Lava Cake Conundrums
- Delicious Variations on the Classic Molten Chocolate Cake
- Serving Suggestions: Elevating Your Individual Dessert Experience
- Frequently Asked Questions about 1
- Embark on Your Molten Chocolate Baking Adventure
Why Chocolate Lava Cakes Are the Ultimate Individual Dessert
There's something undeniably special about an individual dessert. It feels personal, a treat crafted just for you. And when that dessert is a Chocolate Lava Cake, the experience transcends mere indulgence; it becomes a moment of pure, decadent bliss. These aren't just cakes; they're an event.
The Magic of Molten Chocolate
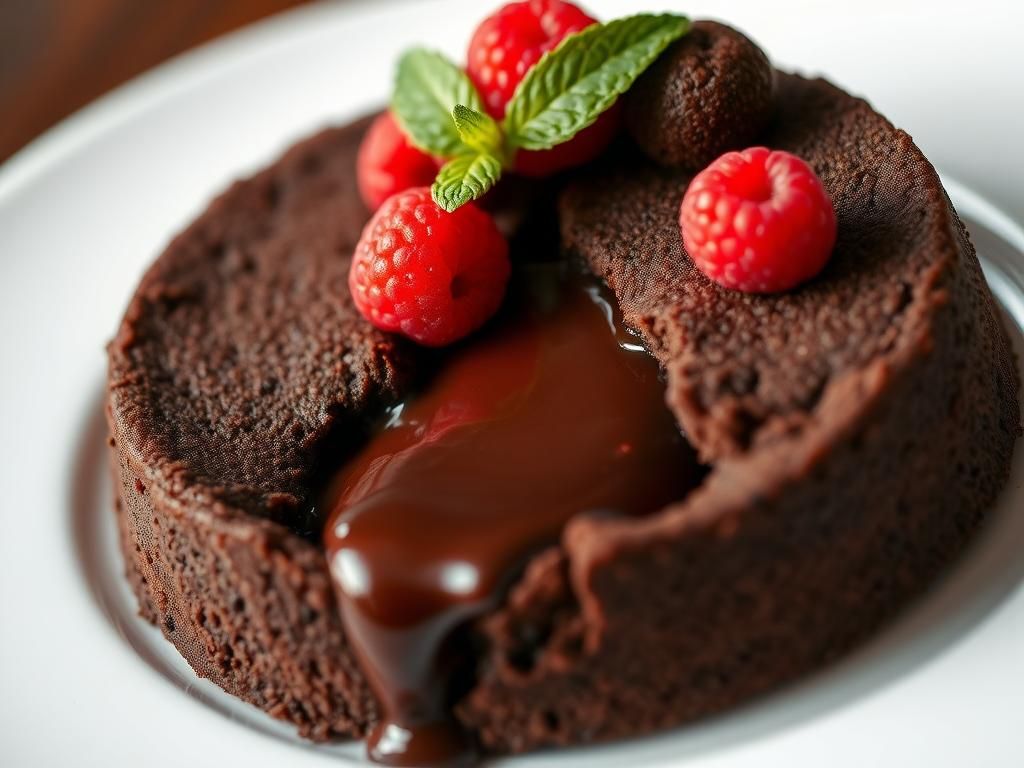
The true allure of a molten chocolate cake lies in that dramatic, warm, gooey center. The contrast between the tender, cakey exterior and the liquid chocolate core is what makes this dessert so captivating. It’s a textural and temperature symphony in every bite, offering a sophisticated yet comforting experience. That first spoonful, releasing the flow of rich chocolate, is a moment of pure culinary magic.
For many, the appeal also lies in the intensity of the chocolate flavor. Unlike some desserts where chocolate is a component, here it is the undisputed star. This makes choosing good quality chocolate paramount, as its nuances will shine through in the final individual dessert.
Perfect for Special Occasions (or Any Occasion!)
While Chocolate Lava Cakes often grace the menus of upscale restaurants and are a popular choice for romantic dinners or celebrations like Valentine's Day or anniversaries, their surprising simplicity makes them accessible for any time you crave a special treat. Their elegant presentation as an individual dessert makes each guest feel uniquely catered to, elevating even a casual weeknight.
Imagine the delight of serving these after a dinner party, or even as a self-indulgent treat after a long week. The "wow" factor they deliver is disproportionate to the effort involved, making them a secret weapon in any home baker's arsenal. The baking process itself is relatively quick, meaning you can often whip them up with minimal notice.
Surprisingly Simple Baking Adventure
Don't let their restaurant-quality reputation intimidate you. The baking process for Chocolate Lava Cakes is remarkably straightforward. With just a handful of core ingredients and a keen eye on the baking time, you can achieve results that rival your favorite patisserie. This guide is designed to walk you through every step, ensuring your success.
The beauty of this individual dessert is its forgiving nature for novice bakers, provided a few key principles are followed. It’s less about intricate pastry skills and more about understanding the balance of ingredients and the critical role of baking duration. Once you master the basic technique, you'll find yourself returning to this recipe time and time again.
Mastering the Molten Center: The Science Behind Perfect Chocolate Lava Cakes
The secret to that iconic flowing center in a Chocolate Lava Cake isn't some complex culinary trickery; it's simple science, primarily centered around precise baking and ingredient interactions. Understanding this will empower you to consistently achieve that perfect molten chocolate flow.
Understanding the "Lava" Flow – It's All About Timing
The "lava" in a Chocolate Lava Cake is essentially a beautifully undercooked center. The batter is rich in fat (from butter and chocolate) and eggs, with very little flour. As the cake bakes, the edges cook and set, forming the cake structure, while the center remains warm and liquid.
The key is to pull the cakes from the oven at the exact moment the edges are firm but the center is still soft and jiggly. Overbake even slightly, and you'll have a delicious, but fully cooked, small chocolate cake. Underbake, and the cake might collapse entirely when inverted. This delicate balance is why oven temperature accuracy and vigilant timing are crucial for this individual dessert.
Key Ingredients and Their Roles in Your Molten Chocolate Masterpiece
Each ingredient in a Chocolate Lava Cake plays a vital role. Using high-quality components will significantly impact the flavor and texture of your final individual dessert.
Chocolate: The Star of the Show
This is not the place to skimp! The flavor of your Chocolate Lava Cakes is predominantly determined by the chocolate you use.
- Type: Bittersweet or semi-sweet chocolate with a cacao percentage between 60% and 72% is generally preferred. This range provides a deep, rich chocolate flavor without being overly sweet, balancing beautifully with the other ingredients. Dark chocolate is key for that intense molten chocolate experience.
- Quality: Use good quality baking chocolate, often sold in bars or callets (large chips). Avoid generic chocolate chips designed to hold their shape during baking, as they may not melt as smoothly for the lava center. Serious Eats offers a great guide to different types of chocolate which can help you choose.
Butter: For Richness and Texture
Unsalted butter allows you to control the salt content in your recipe. It contributes significantly to the richness, tenderness, and moistness of the cake. The fat in the butter also helps create that luscious, flowing molten chocolate center.
Eggs & Yolks: Structure and Ooze
Eggs, particularly the yolks, are crucial for several reasons:
- Structure: Whole eggs provide structure to the cakey exterior.
- Richness & Emulsification: Egg yolks add richness, fat, and act as an emulsifier, contributing to the smooth, creamy texture of the lava. Many recipes call for extra egg yolks precisely for this reason, enhancing the molten quality.
- Leavening: While not the primary leavening agent, eggs do provide some lift.
It's important to use eggs at room temperature for better incorporation into the batter. According to the FDA, eggs should be cooked thoroughly to prevent illness, but the partial cooking in lava cakes is generally accepted for this style of dessert when using fresh, properly handled eggs.
Sugar: Sweetness and Balance
Granulated sugar or caster sugar (superfine sugar) is typically used. It provides sweetness to balance the bitterness of the dark chocolate and also contributes to the cake's structure and tenderness. The amount can be adjusted slightly based on the sweetness of your chosen chocolate and personal preference.
Flour: Just a Touch for Stability
A very small amount of all-purpose flour is used – just enough to give the cake's exterior some structure and prevent it from being completely pudding-like. Too much flour will result in a denser, more cake-like texture throughout, diminishing the molten chocolate effect. For a gluten-free individual dessert, a good quality gluten-free all-purpose blend can often be substituted in the small quantity required.
Temperature Matters: Oven and Ingredients
Consistent temperatures are paramount in baking Chocolate Lava Cakes.
- Oven Temperature: Ensure your oven is accurately calibrated. An oven thermometer is a baker's best friend. Most recipes call for a relatively high temperature (e.g., 400-450°F / 200-230°C) to quickly set the edges while leaving the center molten.
- Ingredient Temperature: Bringing cold ingredients like eggs and butter to room temperature before mixing helps them incorporate more evenly, leading to a smoother batter and a more consistent bake. Melted chocolate and butter should be warm, not hot, when combined with the eggs to prevent scrambling.
Understanding these elements gives you greater control over your baking process, paving the way for consistently perfect Chocolate Lava Cakes.
Step-by-Step Guide to Baking Irresistible Chocolate Lava Cakes
Ready to embark on your baking journey to create the most divine Chocolate Lava Cakes? This step-by-step guide will ensure your molten chocolate individual dessert is a showstopper.
Gathering Your Equipment: What You'll Need
Before you begin, gather your tools. Having everything ready (mise en place) makes the baking process smoother.
- Ramekins: Four to six 4-ounce or 6-ounce ramekins are standard. The size will affect baking time.
- Mixing Bowls: At least two – one for melting chocolate and butter, another for whisking eggs and sugar.
- Whisk: For combining ingredients smoothly.
- Spatula: For folding and scraping the bowl.
- Small Saucepan or Double Boiler: For melting chocolate and butter (or use a microwave).
- Measuring Cups and Spoons: For accurate ingredient measurement.
- Oven Thermometer (Recommended): To ensure accurate oven temperature.
- Baking Sheet: To place ramekins on for easier handling.
Ingredient Preparation: Mise en Place for Molten Success
- Prep Ramekins: Generously butter the insides of your ramekins. Then, either dust with cocoa powder (for a richer chocolate finish) or granulated sugar (for a slightly crispier edge). Tap out any excess. This step is crucial for easy release.
- Preheat Oven: Preheat your oven to 425°F (220°C). Place an oven rack in the center.
- Measure Ingredients: Accurately measure all your ingredients. Chop chocolate if using bars.
The Recipe: Your Blueprint for Individual Dessert Perfection
This recipe yields approximately 4-6 Chocolate Lava Cakes, depending on ramekin size.
Prep Time: 20 minutes
Cook Time: 10-14 minutes
Ingredients:
- 4 ounces (115g) good-quality bittersweet or semi-sweet chocolate (60-70% cacao), chopped
- 4 ounces (115g / ½ cup) unsalted butter, cut into pieces
- 2 large whole eggs
- 2 large egg yolks
- ¼ cup (50g) granulated sugar (or caster sugar)
- ⅛ teaspoon salt
- 2 tablespoons (15g) all-purpose flour
- Optional for dusting: unsweetened cocoa powder or extra sugar
- Optional for serving: powdered sugar, fresh berries, vanilla ice cream
Instructions:
- Melt Chocolate and Butter: Combine the chopped chocolate and butter in a heatproof bowl set over a saucepan of simmering water (double boiler method), ensuring the bottom of the bowl doesn’t touch the water. Stir occasionally until completely melted and smooth. Alternatively, melt in the microwave in 20-second intervals, stirring in between, until smooth. Remove from heat and let cool slightly for about 5-10 minutes (it should be warm, not hot).
- Whisk Eggs and Sugar: In a separate medium bowl, whisk together the whole eggs, egg yolks, granulated sugar, and salt. Whisk vigorously for about 2-3 minutes until the mixture is pale, slightly thickened, and ribbony. This incorporates air, which helps with the cake's texture.
- Combine Wet Ingredients: Gently pour the slightly cooled melted chocolate and butter mixture into the egg mixture. Whisk until just combined. Be careful not to overmix at this stage.
- Fold in Flour: Sift or sprinkle the flour over the chocolate mixture. Gently fold it in with a spatula until just incorporated. Do not overmix; a few small streaks of flour are okay. Overmixing can develop gluten and make the cakes tough.
- Fill Ramekins: Divide the batter evenly among the prepared ramekins, filling each about two-thirds to three-quarters full. Place the filled ramekins on a baking sheet.
- Bake: Transfer the baking sheet to the preheated oven. Bake for 10-14 minutes. The exact time will depend on your oven, ramekin size, and desired level of moltenness. The edges of the cakes should look set and slightly puffed, while the very center should still be soft and slightly jiggly. A toothpick inserted about ½ inch from the edge should come out with a few moist crumbs, but the center should remain wet.
- Cool Slightly: Once baked, carefully remove the baking sheet from the oven. Let the Chocolate Lava Cakes rest in their ramekins for 1-2 minutes. Do not let them cool for too long, or the center will continue to cook and set.
- Invert and Serve: To serve, carefully run a thin knife around the edge of each cake if needed (though thorough greasing should prevent sticking). Place an individual dessert plate on top of a ramekin and, using oven mitts if still hot, confidently invert it. Gently lift the ramekin. The cake should release easily.
- Garnish and Enjoy: Dust with powdered sugar, serve with fresh berries, a scoop of vanilla ice cream, or a drizzle of raspberry coulis. Serve immediately to enjoy the warm, molten chocolate center.
Baking Your Chocolate Lava Cakes: The Crucial Timings
The 10-14 minute baking window is a guideline. Start checking around the 10-minute mark for 6-ounce ramekins, or even earlier (8-9 minutes) for 4-ounce ramekins. Look for those visual cues: set edges, soft center. It’s better to slightly underbake than overbake if you're aiming for maximum molten chocolate flow.
The Grand Reveal: Inverting and Serving Your Molten Chocolate Delights
The moment of inversion is always a bit nerve-wracking but oh-so-satisfying. A well-greased and dusted ramekin is your best friend here. Serve your Chocolate Lava Cakes immediately for the full effect. The warm, flowing chocolate combined with the tender cake is an experience best enjoyed fresh from the oven. This individual dessert truly shines when served hot.
Pro Tips & Tricks for Flawless Molten Chocolate Individual Desserts Every Time
Achieving that perfect ooze in your Chocolate Lava Cakes consistently comes down to a few key techniques and choices. These pro tips will elevate your baking game and ensure your molten chocolate individual desserts are always a hit.
Choosing the Right Chocolate for Maximum Molten Impact
The quality and type of chocolate are paramount.
- Go for Bars or Callets: Use good quality baking chocolate bars (like Scharffen Berger, Valrhona, Callebaut) or callets/pistoles, which are designed for melting. Chop bars into small, even pieces for quicker, more uniform melting.
- Cacao Percentage: As mentioned, 60-72% cacao is ideal for a rich, complex molten chocolate flavor that's not overly sweet. If you prefer a sweeter cake, you can go slightly lower, or for a more intense bitterness, slightly higher.
- Avoid Chocolate Chips (Usually): Standard chocolate chips contain stabilizers to help them keep their shape during baking. While some high-quality chips might work, they generally don't melt as fluidly as baking bars, which can compromise that signature lava flow.
Achieving the Perfect Bake: Visual Cues and Toothpick Tests (and why they sometimes fail here)
Knowing when to pull your Chocolate Lava Cakes from the oven is the most critical step.
- Visual Cues are Key: The edges should be set and slightly puffed, pulling away just a tiny bit from the sides of the ramekin. The surface might look mostly matte, but the very center (about the size of a quarter or half-dollar) should still look soft, slightly wet, and jiggly when you gently nudge the pan.
- The Modified Toothpick Test: A standard toothpick test (inserting in the center and looking for it to come out clean) does not apply here, as you want a molten center. Instead, insert a toothpick about ½ inch from the edge of the cake. It should come out with some moist crumbs attached, but not completely wet batter. If the center itself feels very liquid, give it another minute or two.
- Err on the Side of Underbaking (Slightly): For a truly molten chocolate experience, it's better to pull them a minute too early than a minute too late. A slightly overbaked lava cake is still a delicious chocolate cake, but it won't have the signature flow.
Preparing Ramekins for Easy Release
Nothing is more disheartening than a beautiful Chocolate Lava Cake sticking to its ramekin.
- Butter Generously: Use softened (not melted) butter to grease every nook and cranny of the ramekin. Ensure an even, thorough coating.
- Dust Well: After buttering, dust with unsweetened cocoa powder (for an intensely chocolatey exterior) or granulated sugar (for a slightly crisp, caramelized edge). Swirl it around to coat completely, then tap out the excess. Cocoa powder is often preferred as it doesn't add extra sweetness and blends seamlessly with the chocolate flavor.
- Chill (Optional Pro Tip): For extra insurance, after buttering and dusting, you can chill the prepared ramekins in the refrigerator for about 10-15 minutes before filling. This helps the coating stay put.
Make-Ahead Magic: Can You Prepare Lava Cakes in Advance?
Yes, you can prepare components of your Chocolate Lava Cakes ahead of time, which is perfect for entertaining!
- Batter Prep: You can prepare the batter, pour it into the prepared ramekins, cover them with plastic wrap, and refrigerate for up to 24 hours.
- Baking from Chilled: If baking from chilled, you may need to add a few extra minutes (2-5 minutes) to the baking time. Let the ramekins sit at room temperature for about 20-30 minutes before baking if possible, for more even results.
- Unbaked, Frozen: Some bakers even freeze unbaked lava cakes in their ramekins. Wrap them well and freeze for up to a month. Bake directly from frozen, adding significantly more time (perhaps 10-15 minutes extra). Results can vary with freezing, so test this method with your recipe first.
These tips will help you approach the baking of your molten chocolate individual desserts with confidence, ensuring a spectacular result every time.
Troubleshooting Common Chocolate Lava Cake Conundrums
Even with the best intentions, baking can sometimes present challenges. Here’s how to troubleshoot some common issues when making Chocolate Lava Cakes so you can achieve that perfect molten chocolate individual dessert.
My Lava Cake Didn't Flow – What Went Wrong?
This is the most common disappointment. Usually, it means the cake was overbaked.
- Overbaking: Even an extra minute or two in a hot oven can cook the center through. Next time, reduce the baking time and check earlier. Note your oven's quirks; it might run hot.
- Oven Temperature Too Low: If the oven isn't hot enough, the cake cooks too slowly and evenly, setting the center before the edges are perfectly done. Ensure your oven is accurately preheated; an oven thermometer is invaluable.
- Ramekin Size/Material: Smaller ramekins cook faster. Glass or very thick ceramic ramekins might take longer than standard ceramic or metal ones.
- Too Much Flour: Double-check your flour measurement. Excess flour will create a more traditional cake structure rather than a molten chocolate center.
Solution: Pay close attention to visual cues next time – set edges, jiggly center. Start checking for doneness 2-3 minutes before the recipe's minimum recommended time.
My Cakes Are Too Runny or Undercooked
The opposite problem – the cake collapses into a pool of batter.
- Underbaking: The structure didn't have enough time to set. The edges need to be firm enough to hold the molten center when inverted.
- Oven Temperature Too High: If the oven is excessively hot, the outside might look done (or even burn) before the internal structure has had a chance to set sufficiently.
Solution: Increase baking time by 1-2 minute increments. Ensure your oven temperature is accurate. The cake should still have a very soft center, but the outer 1/2 to 1 inch should be visibly baked.
My Lava Cakes Stuck to the Ramekin
A frustrating end to your baking efforts!
- Insufficient Greasing/Dusting: This is the primary culprit. Every part of the ramekin interior needs a good coat of butter and a thorough dusting of cocoa powder or sugar.
- Waiting Too Long to Invert: If the cakes cool too much in the ramekins, they can start to stick as sugars solidify. Aim to invert within 1-3 minutes of removing them from the oven.
- Rough Inversion: Be gentle but confident when inverting.
Solution: Be meticulous with ramekin preparation. If a cake seems stuck, gently run a thin, flexible knife or offset spatula around the edge before inverting.
Why is My Chocolate Lava Cake Batter Grainy?
A grainy texture in your molten chocolate batter usually points to issues with the chocolate or eggs.
- Overheated Chocolate: If the chocolate (and butter) mixture is too hot when combined with the eggs, it can slightly cook the eggs, leading to a grainy texture. Let the chocolate cool to lukewarm.
- Seized Chocolate: If water gets into your melting chocolate, it can "seize," becoming thick and grainy. Ensure your bowl and utensils are perfectly dry, and if using a double boiler, don't let water splash in.
- Eggs Too Cold: Cold eggs don't emulsify as well with the warm chocolate mixture, which can sometimes lead to separation or a slightly off texture. Use room-temperature eggs.
Solution: Melt chocolate gently and allow it to cool adequately. Use room-temperature eggs and ensure no water contaminates your chocolate.
By understanding these common pitfalls, you can adjust your technique and consistently produce stunning Chocolate Lava Cakes with that signature molten chocolate core, making your individual dessert creations the talk of the table.
Delicious Variations on the Classic Molten Chocolate Cake
Once you've mastered the classic Chocolate Lava Cake, the door opens to a world of delicious variations. Tweaking ingredients can add new dimensions of flavor and texture to this beloved individual dessert, keeping your baking adventures exciting.
Adding a Hint of Flavor: Espresso, Spices, or Liqueur
Subtle additions can dramatically enhance the molten chocolate experience.
- Espresso Powder: Add ½ to 1 teaspoon of instant espresso powder to the melting chocolate and butter. Coffee deepens and intensifies chocolate flavor without overtly tasting like coffee.
- Spices: A pinch of cinnamon, cardamom, or even a tiny dash of cayenne pepper (for a hint of warmth) can be whisked in with the flour. These spices pair beautifully with dark chocolate.
- Liqueur: Incorporate 1-2 tablespoons of your favorite liqueur, such as Grand Marnier (orange), Chambord (raspberry), Kahlúa (coffee), or a good quality whiskey or rum. Add it to the melted chocolate mixture or whisk it in with the eggs. This can make the individual dessert even more decadent.
- Vanilla Extract: While not always in traditional recipes, ½ teaspoon of pure vanilla extract added with the eggs can round out the chocolate flavor beautifully.
White Chocolate Lava Cakes: A Sweet Alternative
For those who adore white chocolate, a white Chocolate Lava Cake offers a different kind of molten delight.
- Challenges: White chocolate behaves differently than dark chocolate due to its higher cocoa butter and sugar content and lack of cocoa solids. It can be more prone to scorching and may result in a sweeter cake.
- Tips: Use high-quality white chocolate. You might need to adjust sugar levels in the recipe slightly downwards. The visual cues for doneness might also differ slightly.
Peanut Butter Stuffed Molten Chocolate Cakes
For the ultimate pairing, introduce peanut butter.
- Method 1 (Center Dollop): After pouring half the batter into the ramekins, drop a small spoonful (about 1-2 teaspoons) of creamy peanut butter (or a small, frozen disc of peanut butter) into the center, then top with the remaining batter.
- Method 2 (Peanut Butter Swirl): Slightly warm some peanut butter and swirl a little into the batter before dividing it into ramekins. This creates a marbled molten chocolate and peanut butter effect.
Gluten-Free Chocolate Lava Cakes
Making this individual dessert gluten-free is quite straightforward due to the minimal flour content.
- Flour Substitute: Replace the all-purpose flour with an equal amount of a good-quality gluten-free all-purpose flour blend (one that contains xanthan gum is often best). Almond flour can also work for a slightly nuttier, denser texture, but you might need to experiment with the quantity.
- Naturally Low Gluten: Since so little flour is used, the impact of the substitution is less dramatic than in other baked goods, making this an excellent gluten-free baking option.
Experimenting with these variations allows you to tailor your Chocolate Lava Cakes to specific tastes or occasions, transforming a classic molten chocolate individual dessert into a personalized masterpiece.
Serving Suggestions: Elevating Your Individual Dessert Experience
The Chocolate Lava Cake is a star on its own, but the right accompaniments can elevate this molten chocolate individual dessert from simply delicious to truly extraordinary. Presentation and pairings enhance the overall sensory experience.
Classic Pairings: Ice Cream and Berries
These are timeless for a reason – they provide beautiful contrasts in temperature, texture, and flavor.
- Vanilla Bean Ice Cream: The cool creaminess of high-quality vanilla ice cream melting against the warm, flowing molten chocolate is a match made in heaven. The vanilla also complements the rich chocolate notes.
- Fresh Berries: Raspberries are a classic choice, their tartness cutting through the richness of the chocolate. Strawberries, blueberries, or a mixed berry compote also work beautifully, adding a fresh, fruity counterpoint and vibrant color.
Sauces and Dustings: Caramel, Raspberry Coulis, Powdered Sugar
A simple drizzle or dusting can add a touch of elegance and an extra layer of flavor.
- Powdered Sugar: A light dusting of powdered sugar (confectioners' sugar) is the quintessential finish, adding a touch of sweetness and visual appeal. Use a fine-mesh sieve for an even coating.
- Raspberry Coulis: This vibrant, slightly tart sauce is easy to make by blending fresh or frozen raspberries with a little sugar and lemon juice, then straining. Its bright flavor is a perfect foil to the deep molten chocolate.
- Salted Caramel Sauce: A drizzle of warm salted caramel sauce introduces a delightful sweet-salty complexity that pairs wonderfully with dark chocolate.
- Chocolate Ganache or Sauce: For the ultimate chocoholic, a richer chocolate sauce or a thin layer of ganache can intensify the experience.
- Whipped Cream: A dollop of lightly sweetened freshly whipped cream offers a light, airy contrast to the dense cake and molten chocolate center.
Presentation Matters: Making Your Molten Chocolate Cakes Instagram-Worthy
The visual appeal of your individual dessert enhances the enjoyment.
- Plate Choice: Serve on a contrasting plate – a white plate makes the dark chocolate pop.
- Garnishes: A sprig of fresh mint adds a touch of green and freshness. Edible flowers can create an elegant, restaurant-quality presentation. A few artfully placed berries or a chocolate curl can also elevate the look.
- Arrangement: Consider the placement of the cake, ice cream, sauce, and garnishes on the plate for a balanced and appealing composition. Don't overcrowd the plate.
By thoughtfully considering these serving suggestions, your Chocolate Lava Cakes will not only taste incredible but also look the part, making every baking occasion feel special.
Frequently Asked Questions about 1
Here are answers to some common queries about making the perfect Chocolate Lava Cakes.
How do you know when a lava cake is done?
The edges of the Chocolate Lava Cake should look set and slightly puffed, perhaps pulling away a tiny bit from the ramekin sides. The very center (about 1-inch in diameter) should still look soft, slightly glossy, and will jiggle when you gently nudge the pan. A toothpick inserted ½ inch from the edge should have moist crumbs, not wet batter. Avoid testing the absolute center.
Can I make chocolate lava cakes without ramekins?
Yes, you can use a standard muffin tin to make smaller, bite-sized molten chocolate treats. Grease and flour/cocoa powder the muffin cups very well. Baking time will be significantly shorter (likely 6-10 minutes), so watch them closely. They might be a bit trickier to invert neatly.
What's the difference between a chocolate lava cake and a chocolate fondant?
Often, the terms are used interchangeably, especially in different regions. Traditionally, a "chocolate fondant" (in French pastry) can refer to a small chocolate cake with a molten center, very similar to a lava cake. However, "fondant" can also refer to other types of chocolate cakes or icings. For most intents and purposes when discussing this individual dessert with a gooey center, they mean the same thing.
Why are my lava cakes dry?
Dryness is almost always a sign of overbaking. The "lava" comes from an intentionally undercooked center. If baked too long, that center cooks through, resulting in a standard, albeit small, chocolate cake. Also, ensure you're using enough fat (butter and chocolate richness).
Can I reheat chocolate lava cakes?
While best enjoyed fresh, you can reheat them. The challenge is warming them without cooking the center further. Try microwaving on low power for very short intervals (10-15 seconds) until just warm, or briefly in a low oven (around 300°F/150°C) for a few minutes. The lava flow might not be as dramatic as when freshly baked.
What kind of chocolate is best for molten chocolate cakes?
Good quality bittersweet or semi-sweet chocolate with a cacao percentage between 60% and 72% is ideal. Choose baking chocolate (bars or callets/pistoles) rather than chocolate chips, as baking chocolate melts more smoothly, which is crucial for the molten chocolate center.
Embark on Your Molten Chocolate Baking Adventure
You're now equipped with the knowledge, the recipe, and the pro tips to create truly spectacular Chocolate Lava Cakes. This iconic individual dessert, with its irresistible molten chocolate heart, is more than just a treat; it's an experience. The joy of baking these beauties, watching them emerge perfectly from the oven, and that first incredible spoonful is a reward in itself.
Don't be intimidated. Embrace the process, trust your instincts (and your oven thermometer!), and remember that even a slightly imperfect lava cake is still a delicious chocolate delight. So, gather your ingredients, preheat your oven, and get ready to wow yourself and your loved ones. Happy baking!